Film scanning is one of those topics that really triggers some film aficionados. These are people who wouldn’t dream of handling a negative without a crisp pair of white gloves and a sterile clean room on hand. You can spend extortionate amounts on flatbeds, macro lenses, light boxes and so forth, but what works for the thrifty photographer? The film user who doesn’t want to break the bank?
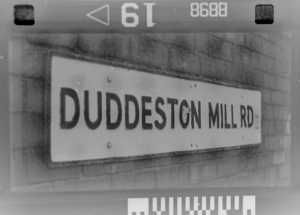
Let us begin with a simple couple of questions: Which one of these three scans do you prefer? Which one cost the most to create? Lets find out…

In this post:
Diminishing returns

One of my most flattering and attractive qualities is that I’m a total cheapskate. I know, I can hear the swoons from here.
So far in our budget film photography journey we’ve looked at which camera you should buy and how to develop your own film. Now it’s time to look at digitising the results of your hard work.
There are times in life when you get exactly what you pay for in terms of quality and there are times when the more you pay the more you are just ripping yourself off. For example, you can buy a T-Shirt sold in Tesco for around £8. You can also buy the exact same T-Shirt with a famous logo on for £40. It is the same material, made in the same factory, in the same appalling working conditions, yet one sells for far more simply because of a badge.
This happens in technology to a lesser extent, but it still happens. Apple used to use Intel CPU’s and AMD graphics processors in their computers. You could buy identical components and build an equivalent machine for hundreds of pounds less, you were simply paying Apple for their design if you went with that option. This argument is moot since they wiped the floor with everyone by releasing their own M series chips, but I digress.
The issue we are here to look in to is do you really need to spend a fortune on a scanner to get acceptable, or even great results from your negative scans? What is the point at which you get diminishing returns from your investment? What if you just plain don’t like spending money?
The contenders
I wanted to look at three options ranging from the absolute cheapest possible contraption I could sellotape together, to a common “what would you get if you just searched Amazon and bought a cheap scanner” and finally a “proper” scanner in the form of a flatbed with negative/transparency hardware built in.
First up, we have the Screwfix Special.
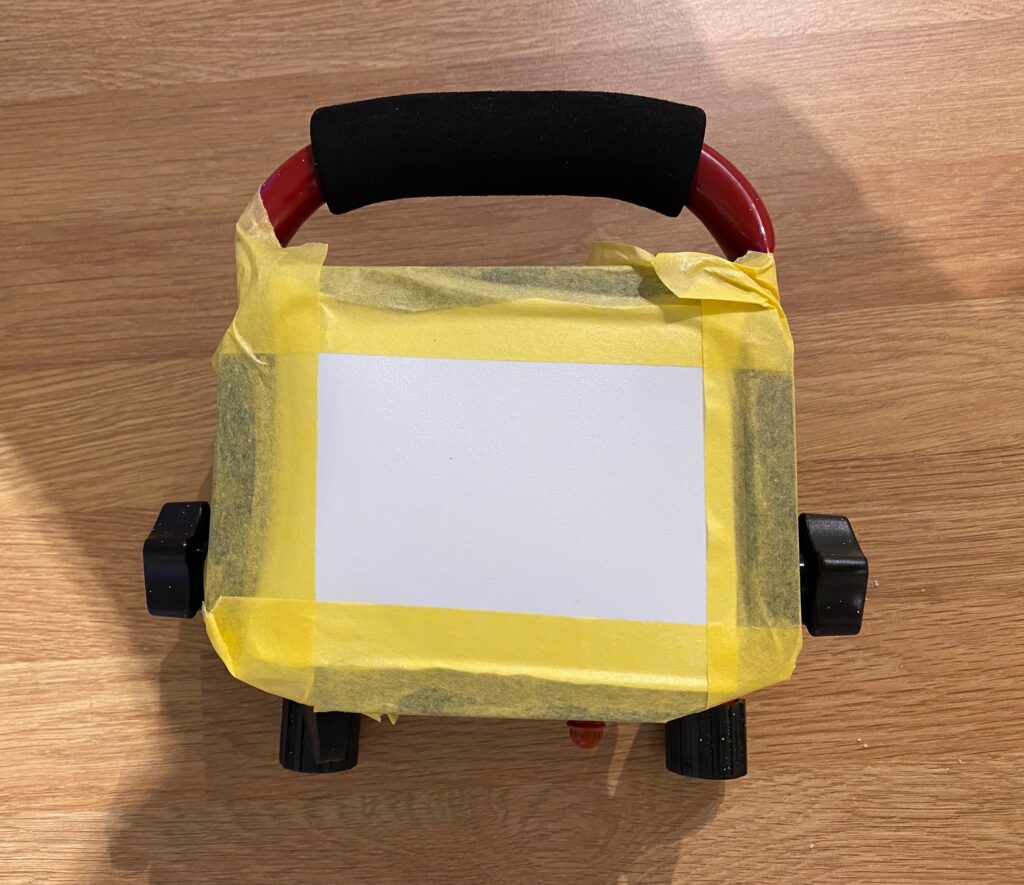
This wonderful contraption consists of the cheapest work light I could find at Screwfix (no longer available but an equivalent is £13). Initially, that was it – just a light, but version 2.0 has this elegant diffuser taped to it made out of the side of a milk bottle (the expensive milk that the cows apparently want back).
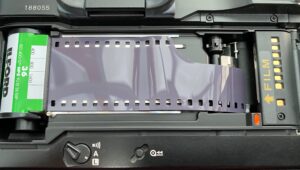
Second we have the most common type of cheap film scanner, this one in the form of a quality Lidl offering.
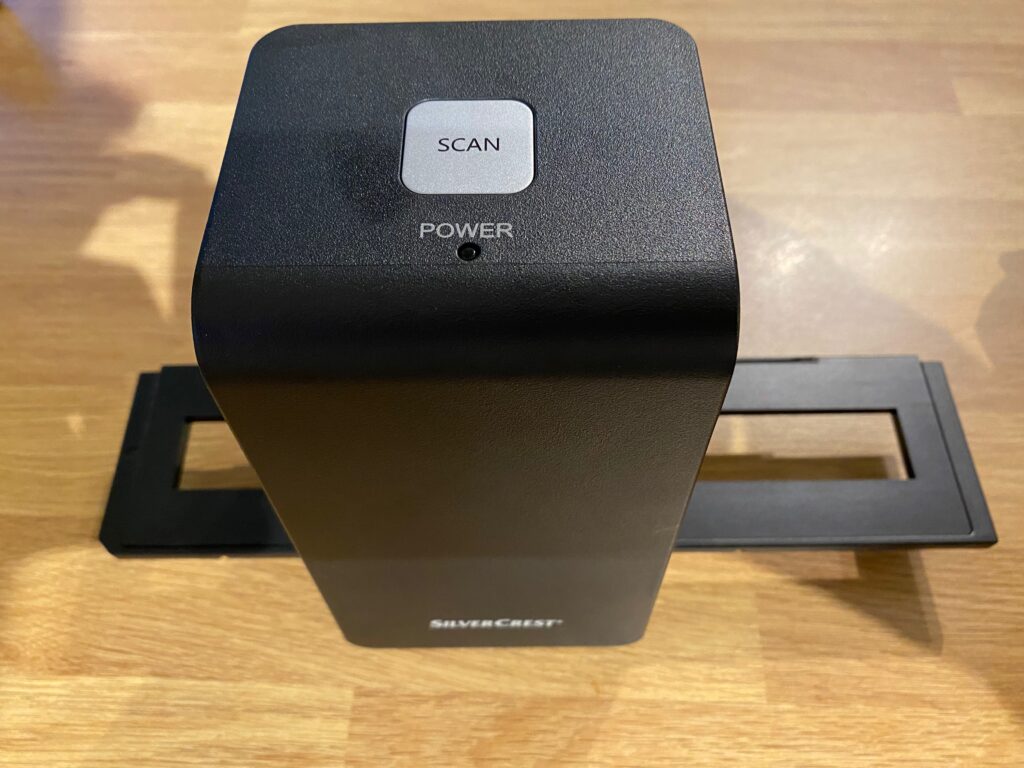
These scanners are Chinese AliExpress jobs that get badged up by different brands and sold in various places. Right now, Amazon is filled with these machines in different cases. They all work in the same way, a negative holder is slid over an imaging sensor, above which is a diffused LED light. Effectively they are a digital camera in a box.
This was £5 boxed from ebay and although it is an older model, the newer ones only really differ in that they are stand alone with screens, memory card readers and maybe some wireless printing capabilities. The quality of sensors used are still fairly similar, they definitely still produce the same resolution.
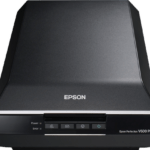
Finally, the flatbed option:

Not the newest of scanners, but half decent in its day. The 4400F has a backlight in the lid into which you can clip film holders. It’ll scan up to 4200dpi before it starts guessing about pixels and the supplied software is reasonable enough. There were more expensive options, the 8800F would scan medium format as well, but for around £100 this was as good as it got in 2007. Now available on ebay for anywhere around £30 upwards.
Features compared
It may sound slightly mad to consider the features of a milk bottle taped to a light when compared to devices designed for the job. However, as we will see, this contraption may actually be one of the most attractive possibilities out of the three.
To summarise:
| Milky Screwfix 2.0 | Lidl Special | Canon 4400f | |
|---|---|---|---|
| Size | Approx 20cm square | Small with sticky out bits | About 1.5 badgers |
| Portability | Super portable – even has a handle | Very | Doesn’t like being moved |
| Resolution | Limited only by your camera and how good the macro mode is | 2520 * 1680 | 3416 * 2232 at 2400dpi |
| Capacity | 1 frame at a time | 1 frame at a time, up to 6 frames in a holder | Up to 6 frames in one scan |
| Speed | Instant once set up | Instant once set up | 1 cup of tea per frame |
| Notable features | Brighter than the sun – requires sun glasses | Live preview of image to be scanned | Can be used for all scanning requirements |
Image quality
We can’t put it off any longer, it is time to reveal the results of our quick quiz from the beginning of this post. From a quick poll of a few contacts it wasn’t as easy as it first seems to pick out which device was responsible for each image. The answers are below:
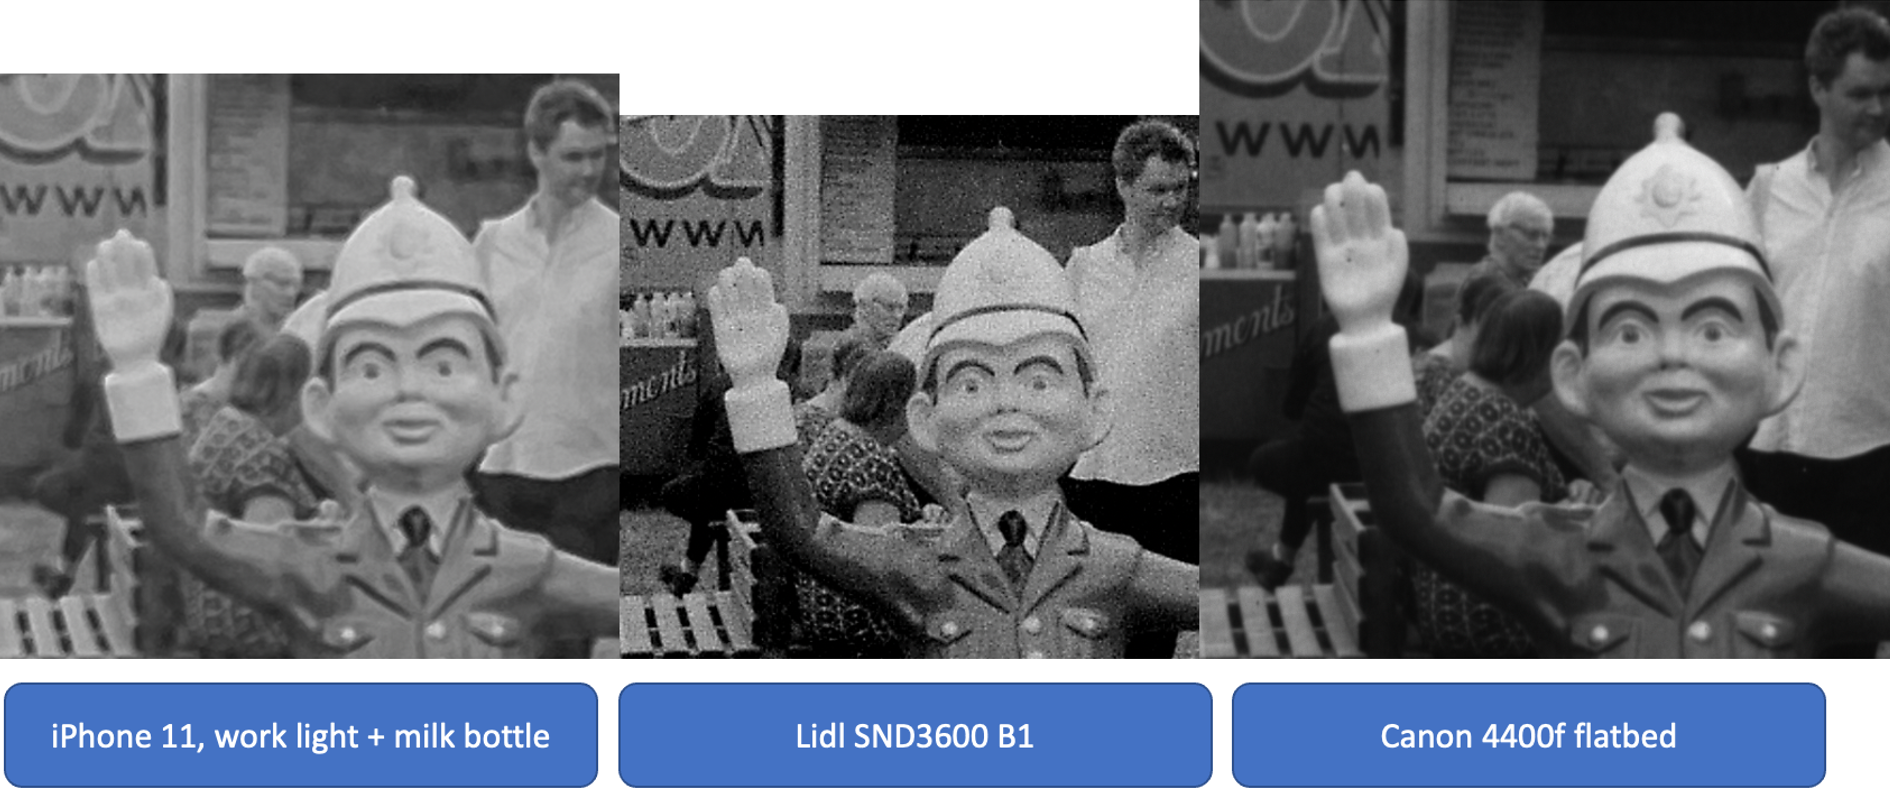
Beginning with the obvious, the Lidl scanner is downright awful. Not only does it produce the smallest files here, it gives images full of grain, noise and lacking in tonal range. It is definitely adding a healthy dose of sharpening straight out of the scanning application and I’d rather that was left to us as users to decide. The less said about this scanner, the better.
What is really interesting is just how good the phone scan is. To give some context, this is literally me holding the negative flat with one hand, whilst my other shaky hand holds the phone and takes a picture. Whilst there is a little softness to the image, this is undeniably a result of being slightly too close for the focus to be happy, a shaky hand and a slapdash approach to the set up.
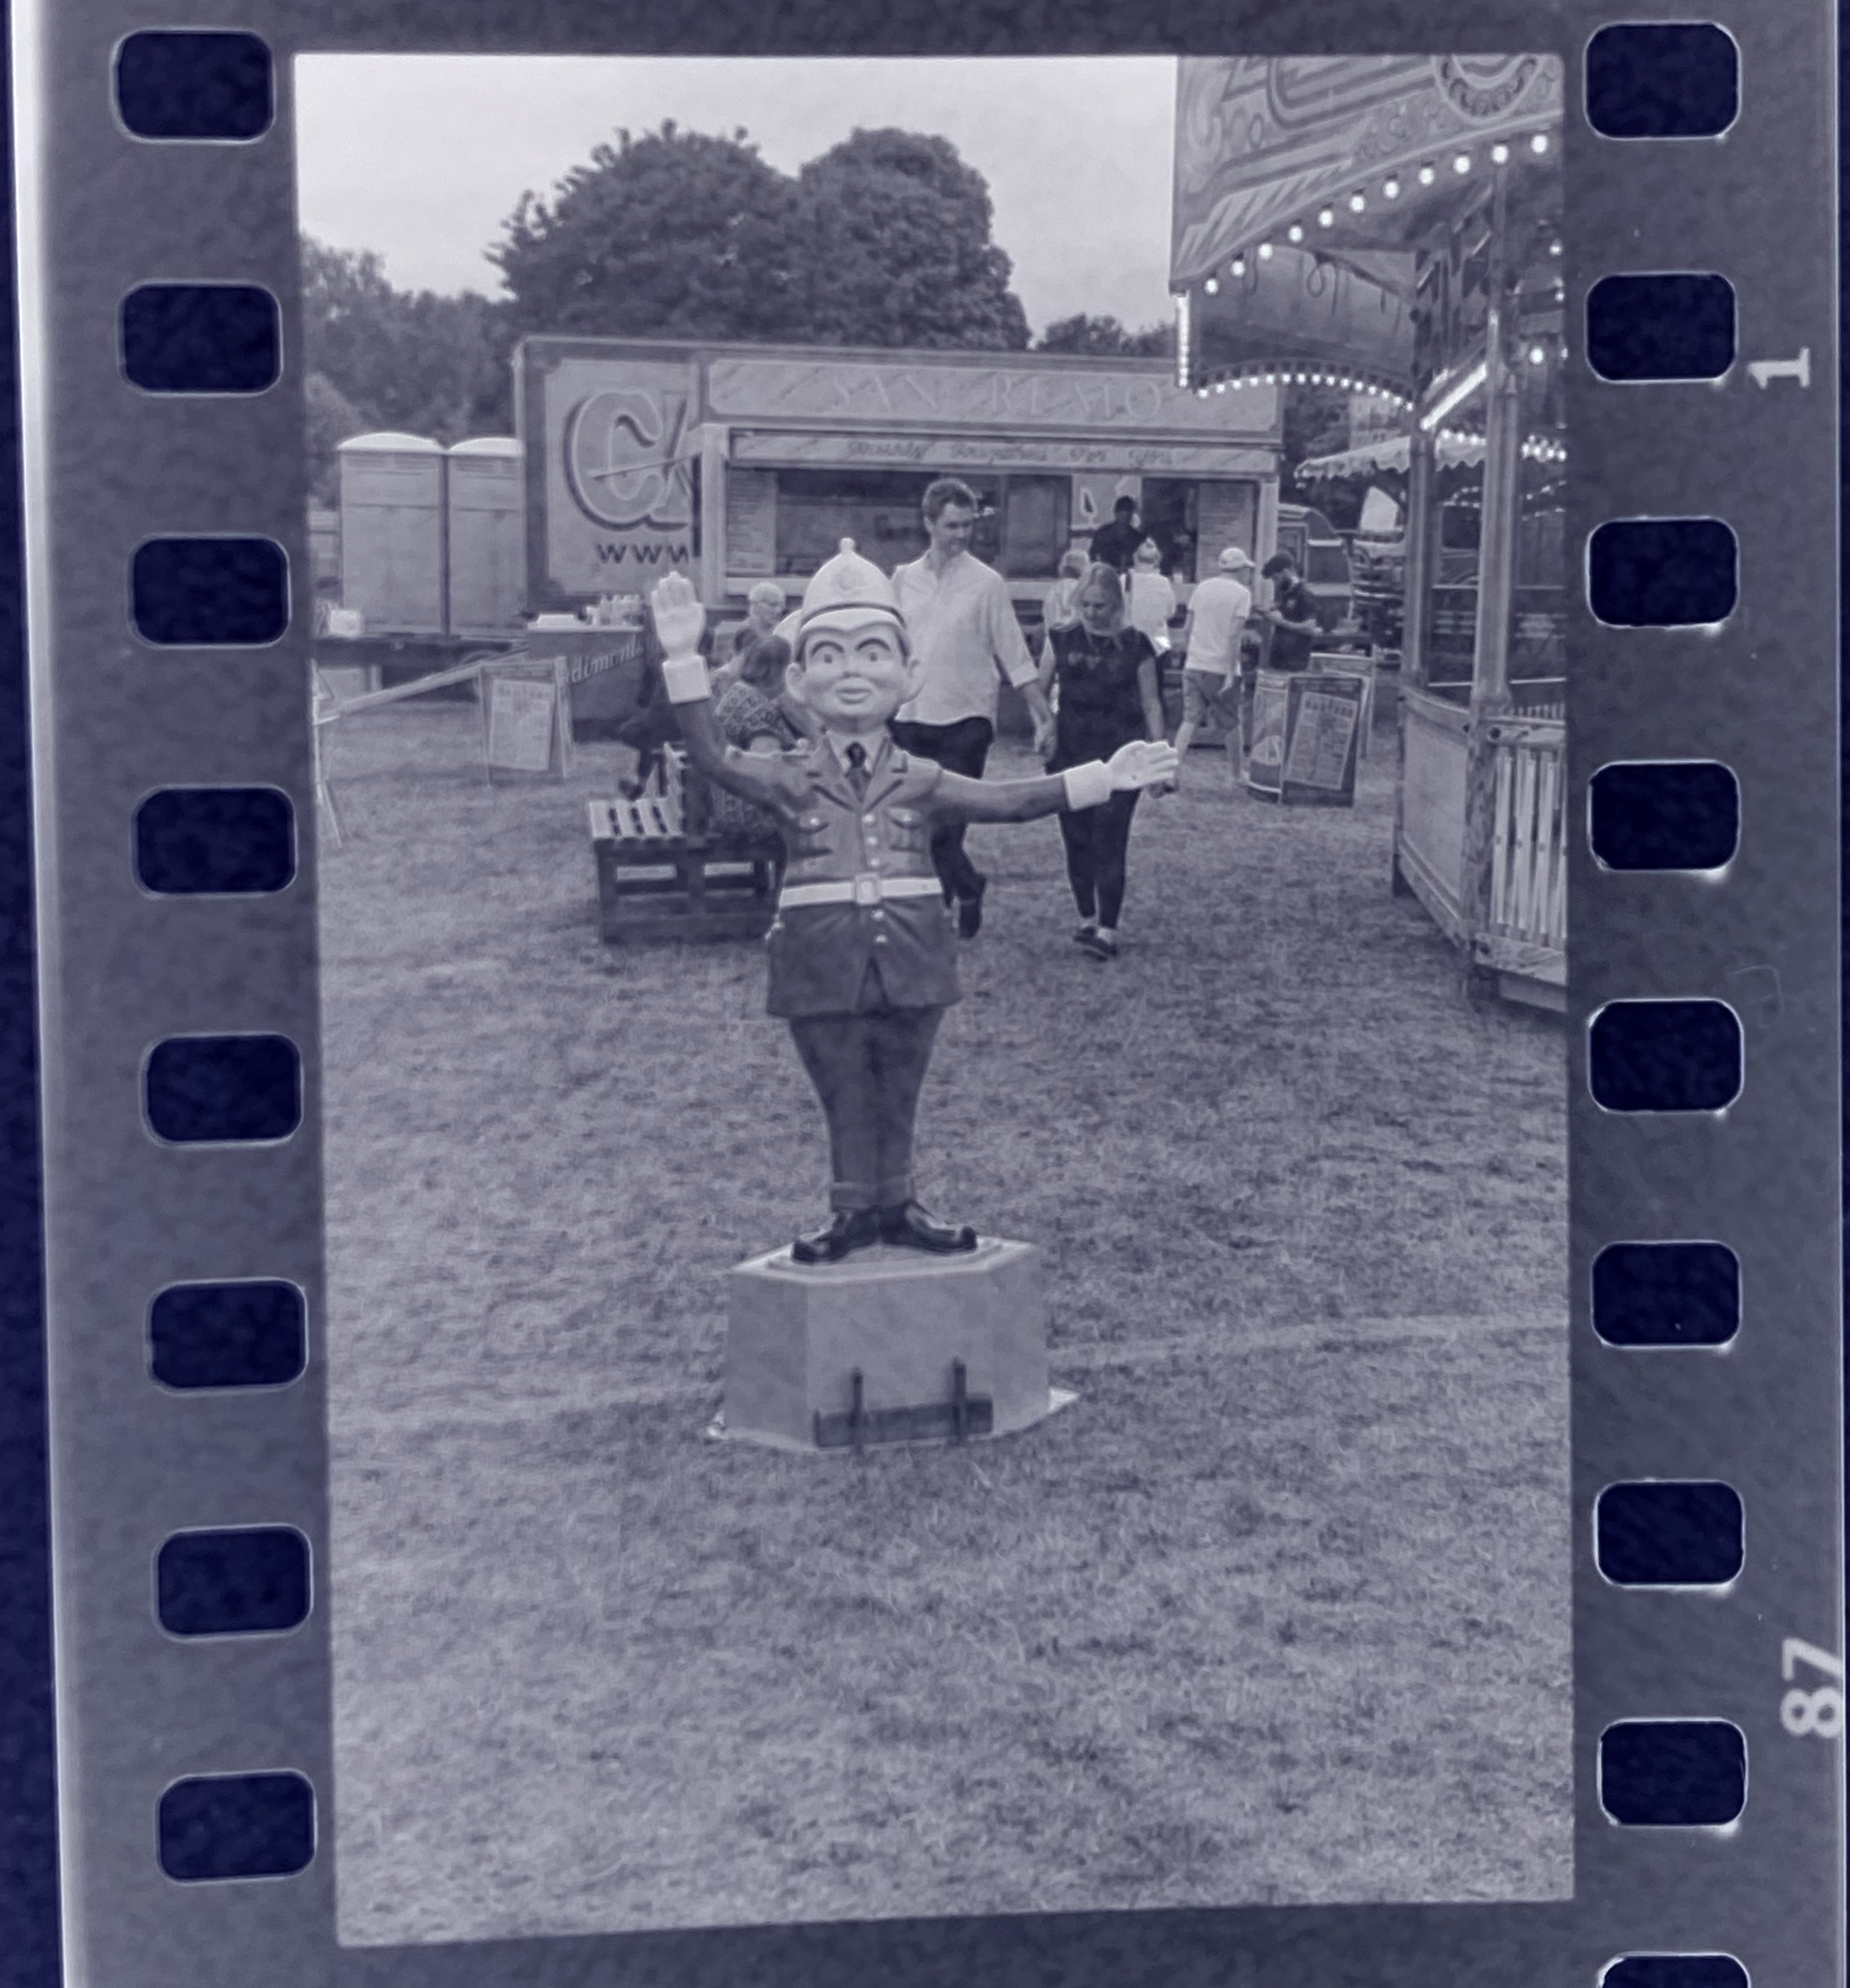
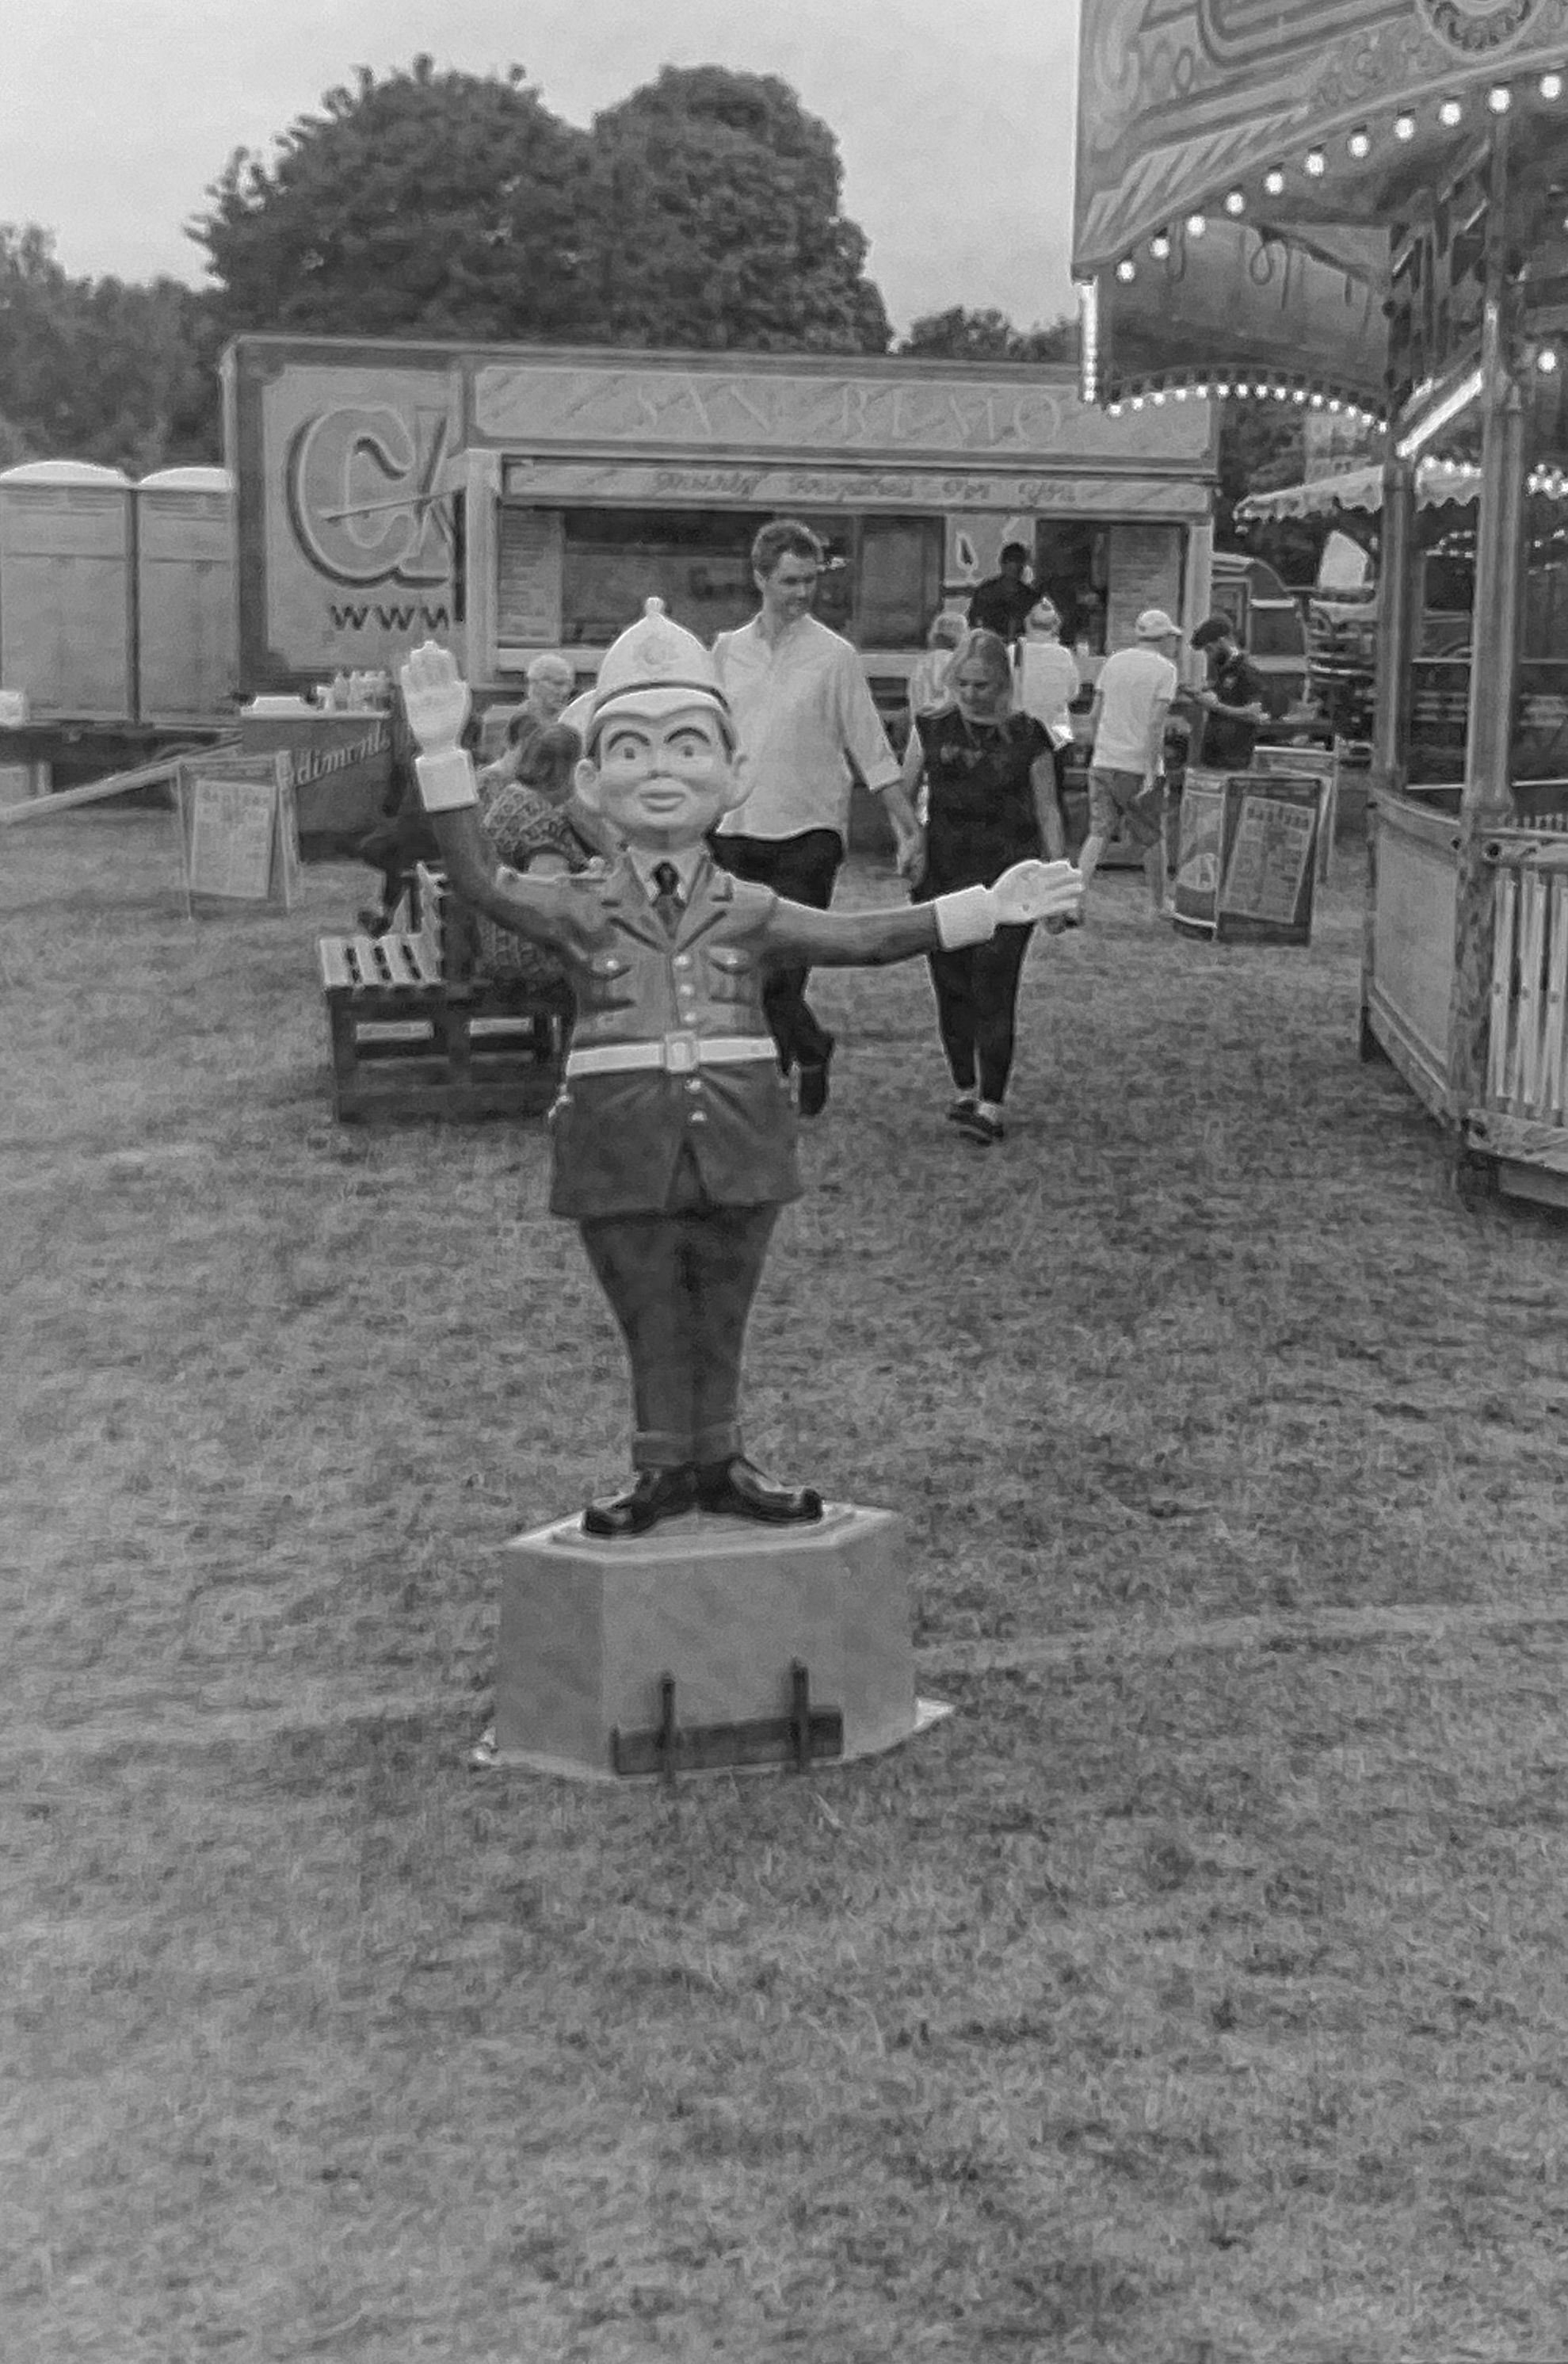
Taking a little more time to hold the negative completely flat, using a tripod or something else to steady the camera would make a huge difference to the final image. It should also be noted that I’m using quite an old phone now, modern models have started to incorporate macro modes that would definitely increase the quality of the scan even further.
Finally, I cannot believe how well the side of a milk bottle works as a diffuser. It created a perfectly flat, even light which was perfect for this application. 10/10 for creative rummaging in the recycle bin.
The Canon 4400f produces the highest quality image here without doubt. There is far more dynamic range in the file, the scan is clear and has a decent look to it straight out of the box. It is difficult to tell whether the softness in this particular frame is the scanner reaching its limit or that the picture was taken on a camera from the 1970s/80s and the optics of the FD 50mm F1.8 just aren’t that sharp.
A win for the flatbed here, but with a higher quality of camera or macro lens, I actually think the Milky Screwfix 2.0 would give the same or potentially better results
Speed
There is no getting away from it, the Canon is painfully slow. At 2400dpi it takes between 2-3 minutes per frame and at 3600dpi you’re looking at 5-7. It can go as high as 4800dpi but honestly, you don’t have enough of your life left to wait for it to finish the job. This is a huge disadvantage for the flatbed but is down to the resolution being used and the age of the scanner. A newer scanner would not suffer from this issue quite as much, but would still be reasonably slow in use.
For all its faults, the Lidl scanner gives an image in an instant. There is the inconvenience of attaching it to a computer, but once set up it is very quick to use and I imagine you could happily digitise a collection of old negatives really quickly. Some thought has gone in to this by the designers, as they include two negative holders for 35mm, so when scanning one you can be loading another to speed things up.
The negative holders are a really good design with one minor flaw, there is a bar across the middle which has to be placed perfectly between two frames. Only this doesn’t work, it never quite lines up and the holder has pegs for the sprocket holes which remove the option to make fine adjustments.
Modern versions of this scanner type would be even quicker to use as they don’t require a connection to a computer.
Finally, the speed of the Milky Screwfix 2.0 really depends on what you’re trying to achieve. For a quick and dirty reveal of what a negative looks like, it is unbeatable. It has the added bonus of acting as a light box so you can give your negatives the once over to check how they’ve come out. Clearly for better and more consistent results you would need to put more care and attention in to the whole setting up and picture taking process. What you put in is definitely proportional to what you will get out.
Software
I thought about being fairly in depth about these three but actually they all have one thing in common – you will end up in Photoshop or GIMP regardless of which option you decide to take.
If you want the best looking pictures you can from your negatives there are two main factors – the highest resolution you can get from your scanner and then the adjustments you make in post processing. The golden rule is don’t let a scanner or the software do anything to your negative other than actually digitise it.
The Lidl and Canon will give you TIFF files as default and these are a decent starting point for some Photoshop work later on. Even better is something like Vuescan which will give you DNG RAW files out of the scanner. These will give you more headroom in terms of recovery from shadows and highlights, for example.
If you use the Milky Screwfix 2.0 then you ideally need a phone that will give you RAW files or a camera that will produce RAW files. This would actually give you the most flexibility of all scanning methods.
Of all options, the Lidl scanner has the worst software and gives the least control over your scan and this is definitely a huge let down. Algorithms are never going to see an image in the way that you do and all settings ideally should be left up to you to decide.
Conclusions and recommendations
Going through the process of comparing three simple solutions side by side has been a real eye opener. I was really intrigued to see how a cheap, modern-ish scanner would stand up against really old technology. The results were not amazing, however I do wonder if a really new version would perhaps fair better. I’m not buying one to find out, though, it really won’t be the direction I’m going to go in.
What really struck me was just how impressive the phone scan was. The final picture once converted in Photoshop is nothing short of remarkable. We must put this in context, this is a lamp out of the garage, a milk bottle taped on top and a picture from an old phone with a minute imaging sensor. Put another way, it is the laziest, lowest quality image possible. Any further amount of care, attention and slightly better equipment would make this a winner.
The downside of such a bodge is how much more prone to damage your negatives are. This is why people who do this a lot will use proper negative holders and a decent light box. That’s not to say you need to spend a lot – negative holders are extremely cheap or even 3D printable if you have one. Better light boxes can be created for next to nothing by using diffused ceiling panel lights in a wooden frame if you’re handy with DIY – this will definitely be my next step.
Flat bed scanners still have an awful lot going for them and for comprehensive, consistently decent results they still win out. They are more expensive, much harder to find these days, but if you get a good one (and I mean much better than my ancient relic) then you will be rewarded with scans of such high quality you’ll be able to compare the grain from one film to another.
The conclusion is clear, for me at least. If you were starting out from scratch, I’d look for a flatbed or dedicated negative scanner and give that a try first, especially if you can source one for cheap from everyone’s favourite internet dumping ground. Beware of buying second hand without doing your homework first. You may well discover that the cheap scanner you’ve found only works with Windows 98 and whilst you can run a virtual machine to solve the problem, it’s another hurdle to overcome.
However, if you just happen to have a macro lens for your existing camera, then I think you’d be fairly bonkers to do anything other than try the photographing a negative on a light box approach. The results are startlingly good.
Share this post: