
I’ve recently spent some time restoring and using a few simple box style 120 film cameras in the form of the Ross-Ensign Ful-Vue, Ful-Vue Super and Ilford Envoy (coming soon to a Ravioli themed site near you). The Ensign cameras were designed to mimic the much more expensive Twin Lens Reflex (TLR) style cameras of the time. The difference being that focus on a box camera is complete guess work, whereas on a TLR, the top lens is linked to the bottom and gives you an accurate preview of the focus and image as it will be recorded by the lower lens.
Very early cameras were all single lens with lots of tricks used to help users focus. My favourite being Ilford who wrote on their lenses “Push in for places, pull out for faces.” Helpful. Other manufacturers wrote on vague distance scales either in feet or yards and left it up to you. If you paid a bit more money you could buy range finders that plugged in to the flash shoe, by merging two images together in to one single clear one you could then look at a scale to see what the distance to your subject was.
None of these systems are ideal. In real life, you just focus to infinity for almost everything except for close ups and then you just guess and pray you’ve got enough distance to keep things in focus. The number of shots that would’ve been lost over the years due to subjects being blurred must be astronomical. I don’t know about you, but I cannot judge a distance accurately to save my life.
Along came the TLR to solve all of these problems. By having one lens for focus and one for image taking you could keep your film dark behind the shutter whilst composing an image using the second lens. Both lenses are matched in terms of focal distance and physically attached in that they both move together as you focus the image. These cameras have one huge advantage over any other I’ve ever used – the viewfinder is the size of your head, really bright and really easy to see focus. They are truly beautiful pieces of engineering.
In this post:
- History
- The lure of TLR
- Price is everything
- A learning curve
- Second roll lucky
- Conclusions and learning
History
In 1916 an employee of the Voigtlander camera company, Reinhold Heidecke, presented the idea for his TLR concept. It is rumoured, although I couldn’t find any proof, that the concept came from the periscope style cameras that were used in World War 1 trenches to protect the operators from enemy fire. Voigtlander didn’t believe in the idea and rejected his proposal. With support from his wife, Heidecke and another Voigtlander employee Paul Franke set up the company that would later become Rollei as “Franke & Heidecke” in 1920.
Due to the condition of Germany post WW1 and the effect of hyper inflation, Franke negotiated the purchase of a large plot of land on the outskirts of Braunschweig for quite literally next to nothing. This was to be the location of the new Rollei company and works.
The proposed camera, the Rolleiflex TLR, was designed from the beginning to be the most robust, reliable, well built camera money could buy. Heidecke moved to an almost all aluminium construction with mechanical shutter so that the camera would operate in the harshest of conditions. It was suggested that he wanted to avoid the issues surrounding the more traditional bellows designs that were popular in the market but susceptible to failure or degradation over time.
Launched in 1928, having only made 11 units, the Rolleiflex was an instant hit with orders coming in at a scale that the company could not keep up with. In 1936 a cheaper version called the Rolleicord was released and proved so popular that over two million units were sold. Both models were extremely successful and built a reputation for reliability and quality.

By the 1960’s, Japanese manufacturers especially had perfected their clone designs of both the Rolleiflex and Rolleicord, notably the Yashima Seiki Company.
Founded in 1949, Yashima Seiki began manufacturing and selling components for clocks, before moving on to cameras, culminating in their first full camera production, amusingly called the “Pigeonflex” in 1953. From then until 1975, Yashima developed, manufactured and sold an almost constant stream of TLR models, each offering slight improvements or differences over their predecessors.
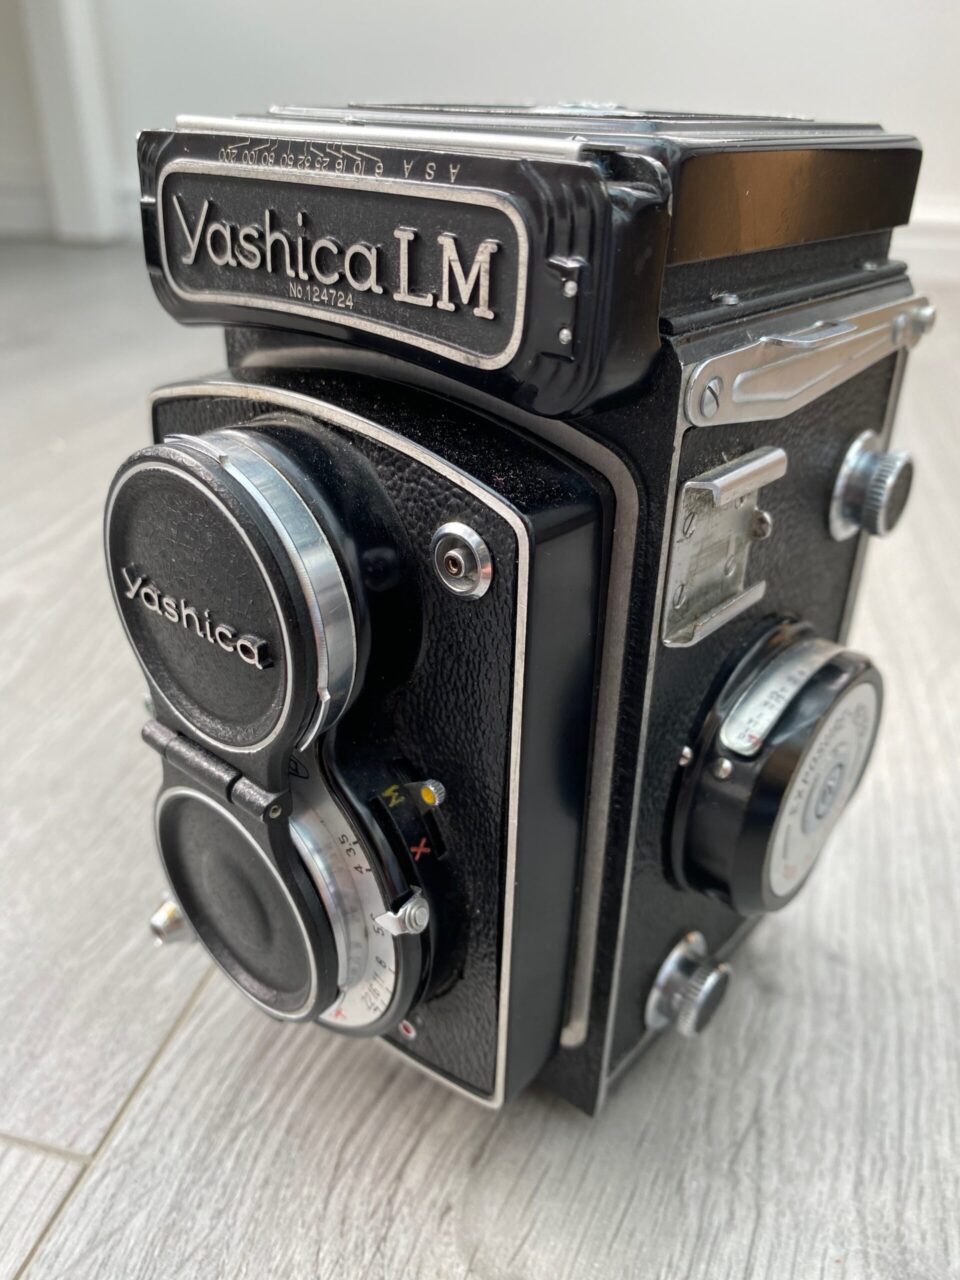
Yashima changed their name to Yashica some time around the mid 1950’s and so ferocious was their release schedule for new models that their chronology is actually fairly unclear today. Models with seemingly incremental numbers or names such as the Yashica A, B, C and D were not released sequentially, but simultaneously in some cases. This confusion goes some way towards explaining why 1957 is something of a guess for the release date of my Yashica LM. All I can say with certainty is it came out no earlier than 1956 and no later than 1958.
This behaviour of flooding the market with new products was not uncommon from “clone” manufacturers and often many variants of the same model would be released to literally see what would stick in the marketplace, on occasion it would simply be to replace a single part with an upgraded model such as the shutter used.
Regardless, Yashica and other brands began to rapidly gain traction in the camera market in the 1960’s and 70’s with Yashica especially gaining a reputation for build quality and decent optics. This fierce competition proved decisive for some existing, well founded companies and many saw their lunch being eaten by far eastern rivals as the popularity of film boomed around the world. Sadly, just as quickly as the market had grown, it saturated, seeing many companies including Yashica ultimately bought out by Kyocera (of photocopier fame) and eventually wound down. Yashica survived until 2005 when it finally ceased production of all cameras after a brief flirt with the digital market came to an abrupt end.
TLR cameras have shown extraordinary longevity, with Rollei themselves manufacturing them as late as 2014. There are still some companies that produce TLR cameras to this day, including the oddly named “Seagull” company which is, according to Wikipedia, the oldest camera maker in China. I had no idea…
The lure of TLR
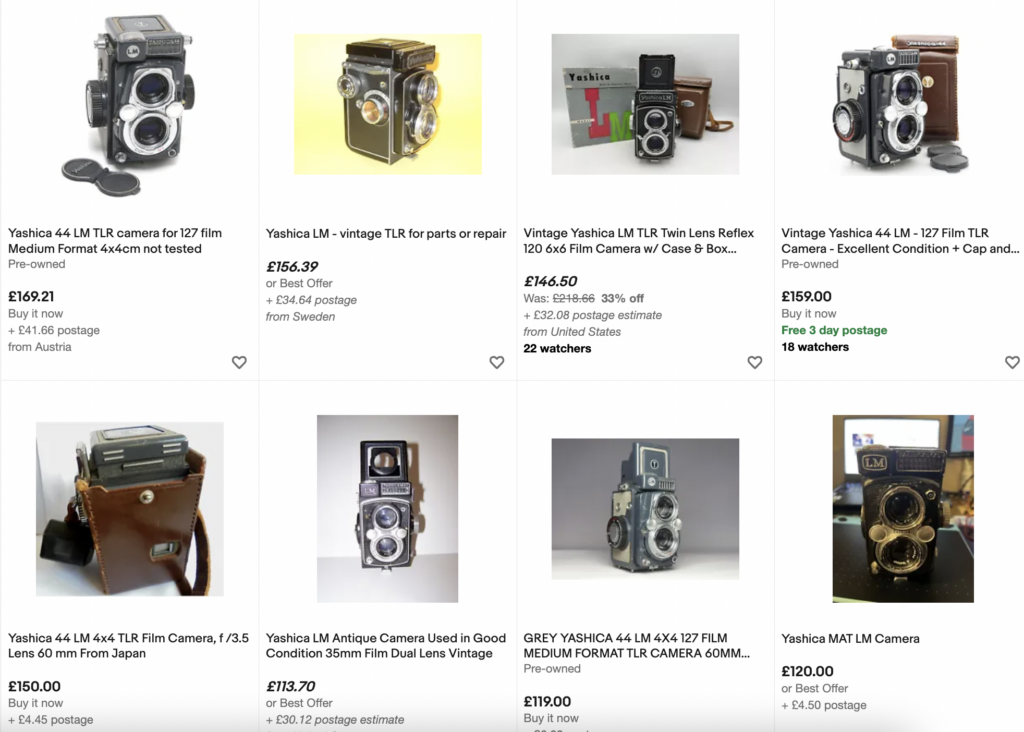
If you’re going to get into the TLR world, there are effectively two choices. You can buy either a Yashica if you’re feeling flush, or a Rollei Rolleiflex if you’re absolutely minted. As far as I can tell there are no cheap options and certainly nothing in the “cheap but decent” category of cameras either – or at least that I could find. This is not something to take lightly if you’re used to the budget path that is so appealing when shooting film as a hobby. As far as I was concerned this was something I would have to invest in both financially and in terms of time.
There is something about the look of a TLR and the obscurity of the design that makes them desirable. By modern standards they are not at all practical and you can hardly call a giant cube ergonomic or comfortable. To compare a TLR to a modern camera is to miss the point, however. They are cameras that you use to embrace the very essence of film, to slow down, compose scenes carefully and enjoy the whole process of creating an image.
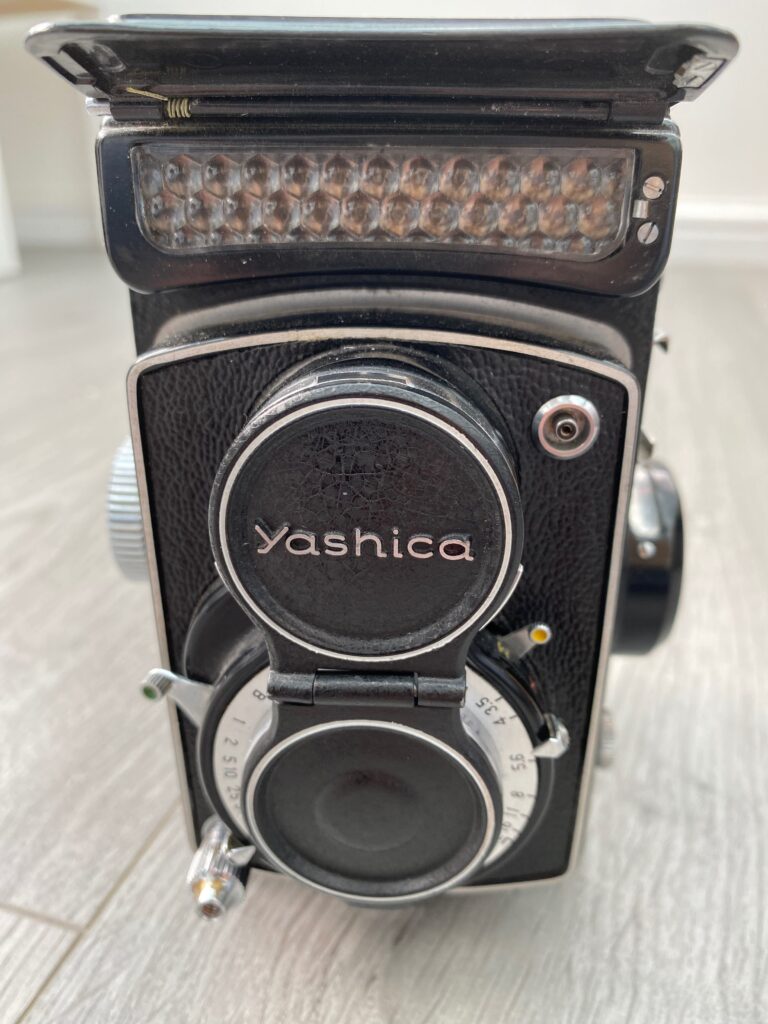
A good TLR is an absolute joy to use and the Yashica LM is no exception. First impressions mean a lot and when I unpacked the LM it just oozed quality. It is so well engineered, feels solid as a rock, every knob and dial feels damped and well put together. There are small touches everywhere, from the way the metal lens cap rotates and clips on, to the tiny release button for the hidden light meter and the completely brilliant flip out focus mirror inside the view finder compartment. Yashica is apparently a “budget” option and if this is the quality of budget I can only imagine how immense a Rolleicord or Rolleiflex must feel.
When it comes to shooting medium format or 120 film, there are basically three main options. You can go for a traditional bellows type camera that folds away nicely and will give you monster 9×6 size frames, a TLR or some kind of box camera. There is a fourth option if you’re absolutely minted and that’s a medium format SLR, which are just incredible both in terms of engineering and the price they now command.
The decision for me was easy, a Yashica might just be in my price range if I got really lucky. Everything else was wish list territory. It was time to browse everyone’s favourite tat bazaar.
Price is everything
I’d concentrated on the idea of getting a model with a built in light meter. I really didn’t do my homework properly here as if I’d used my brain I’d have realised that with a camera like this you are just not taking pictures at any kind of speed. There is a whole process to go through before you actually press the shutter and capture an image, having a light meter doesn’t mean you’re going to speed up.
The light meter on these cameras does nothing more than move a needle along a dial which gives you an F number to then translate into a shutter speed using what is effectively a built in slide rule on top of the body. You read the light meter, slide the slider to the ISO of the film you’re using and then that gives you a shutter speed you can read off, or alternatives if you fancy a different F stop. Not exactly a rapid process. Consequently, I don’t use the light meter at all when I’m using the Yashica, I just point my phone at a scene using a light meter app and read the settings off that. It works a treat.

It didn’t take very long for a potential candidate to pop up on ebay. I still don’t understand why the LM I bought went for only £54 but looking at current prices, I’m glad it did. The Yashica LM is quite an early model, released in 1957 only 5 years after their first TLR had been manufactured. The seller described the camera perfectly, really did care for the equipment and had clearly had some great times with it. They kindly sent it with a roll of Fuji Provia still inside, which I’ve carefully wound up to use another day in the future when I finally get round to buying colour developing chemicals.
I watched it for a while and then stuck a last minute £55 bid in and it was just, by a cats whisker, enough. In hindsight I’d have been devastated to miss this for the sake of a few quid, but stupid though it may sound I felt like I was stretching myself to spend this much on an old camera as it was. All I can say is I’m glad I did, it has already cemented itself as one of my all time favourite photography experiences.
A learning curve
Before using the Yashica I did something that no man usually does. I read the manual. This turned out to be a good idea as there are a couple of nuances that you need to be aware of to avoid damaging things. For example, the shutter cannot be adjusted once you’ve primed it. This may not sound like the end of the world, but I’m fairly sure every photographer has changed the shutter speed just before taking a picture countless times. If you do it on the Yashica LM you risk damaging the delicate mechanism inside. It’s all part of the “slow down, prepare, then shoot” process that you go through with older mechanical cameras.
I went through a roll of Foma Fomapan 200 in a matter of minutes the first time I used the camera and couldn’t wait to get the results out of the developing tank. I couldn’t have been more disappointed with what came out. I learned that being in a rush just doesn’t pay as the lens was covered in dust on the inside of the film chamber. This is normally something I’d have sorted without thinking, I always give new cameras a clean up and a blow out with the rocket blower before use. Having been in such a rush to load the Yashica up and use it, I’d neglected some of the basics and paid for it in the form of black spots all over the images I’d taken.
I also discovered that I’d paid almost no attention to the settings I was using for each frame and that it seems to be a very sensitive machine in terms of both shutter speed and aperture. They both have a much larger effect on the final image than I’m used to or expected.
For landscapes or anything requiring a lot of depth of field, F8 doesn’t really cut it with this lens, F11 or even better F16 is more like it. At F8 the foreground is still really soft, which is fine if that’s the effect you’re going for, but not if you want the whole image in focus. I think I’m just so used to 35mm SLR’s where anything above F8 is just sharp from front to back. Lesson learned for the next roll.
The final quirk is with the shutter speed. I still haven’t worked out why, but at speeds of around 1/30th of a second the centre of the image is perfect, but then the periphery achieves this really quite surreal bokeh/blur effect where everything feels a bit swirly, I can’t think how else to describe it but here’s a perfect example below:
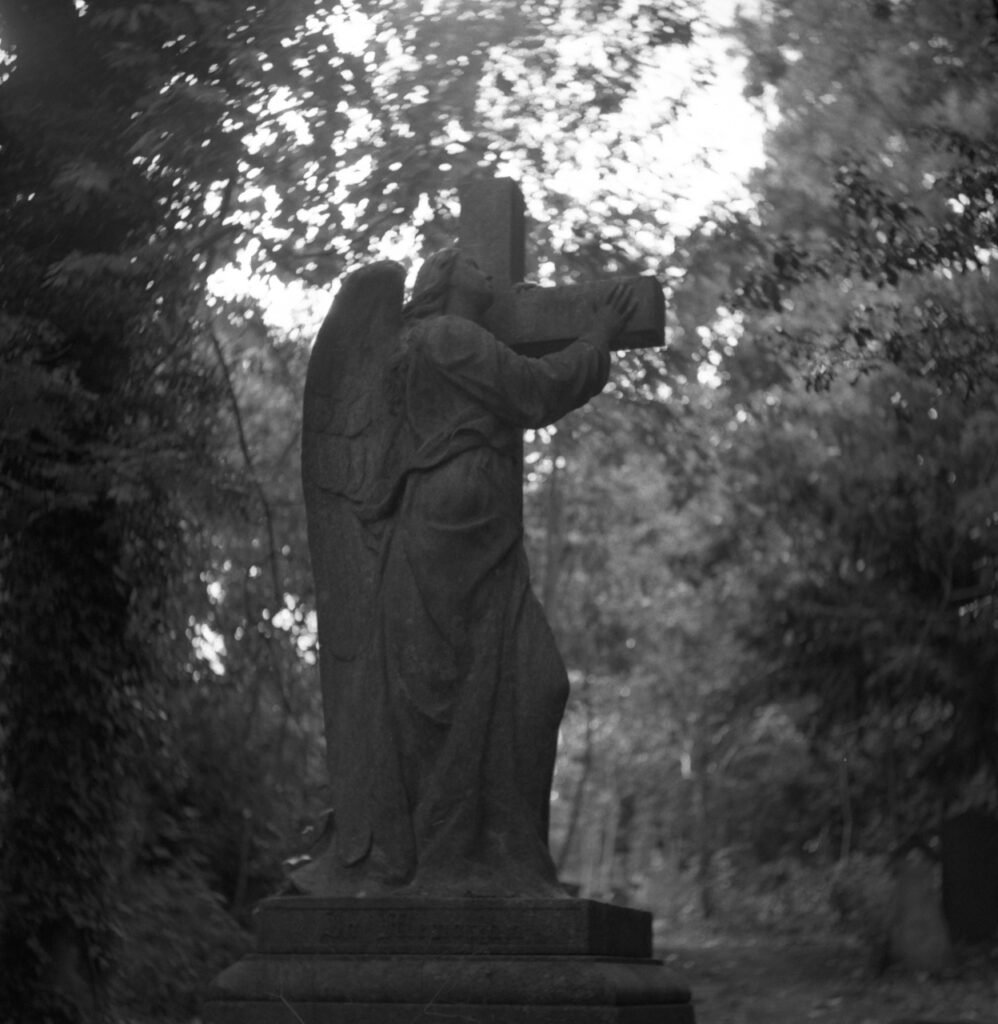
The statue is pretty much in focus and reasonably sharp (for a hand held, slow shutter speed shot) but almost the entire background appears to be spinning round. It’s a really odd effect that I can only think is a combination of movement picked up because of the slow shutter and that this is something to do with the way the aperture blades open and close. Either way its cool and odd in equal measures.
Second roll lucky
With many lessons learned, I loaded up a roll of Fomapan 400 and set out to learn from my mistakes. I promptly forgot which ISO I was using and with no way of finding out other than rolling the film back up and taking it out again, I guessed at 200…

Fortunately, black and white film is extremely forgiving when you make these kinds of mistakes and most shots came out fine within reason. There were a couple that showed signs of exposure issues, but then I also used fixer that was on its last legs with this roll and I don’t think it did me any favours. It is definitely time to buy a new bottle.
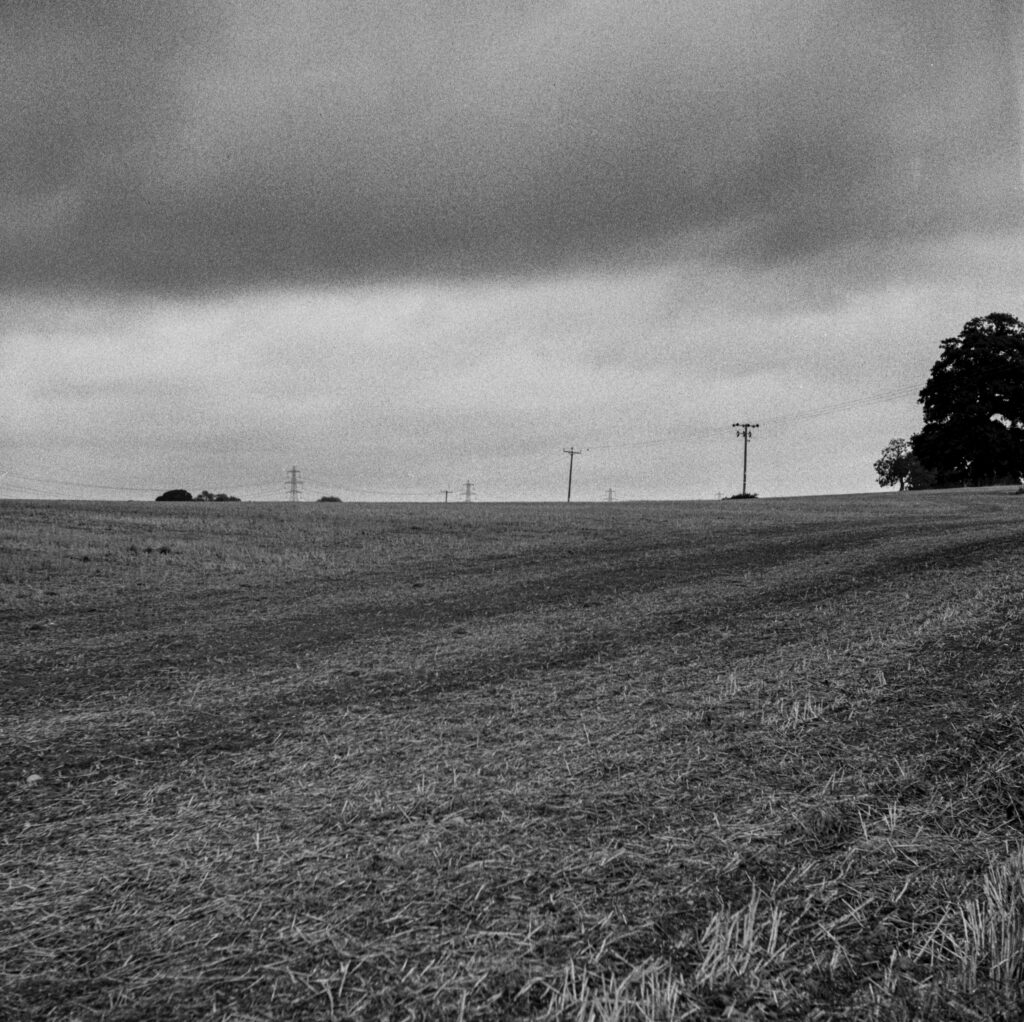
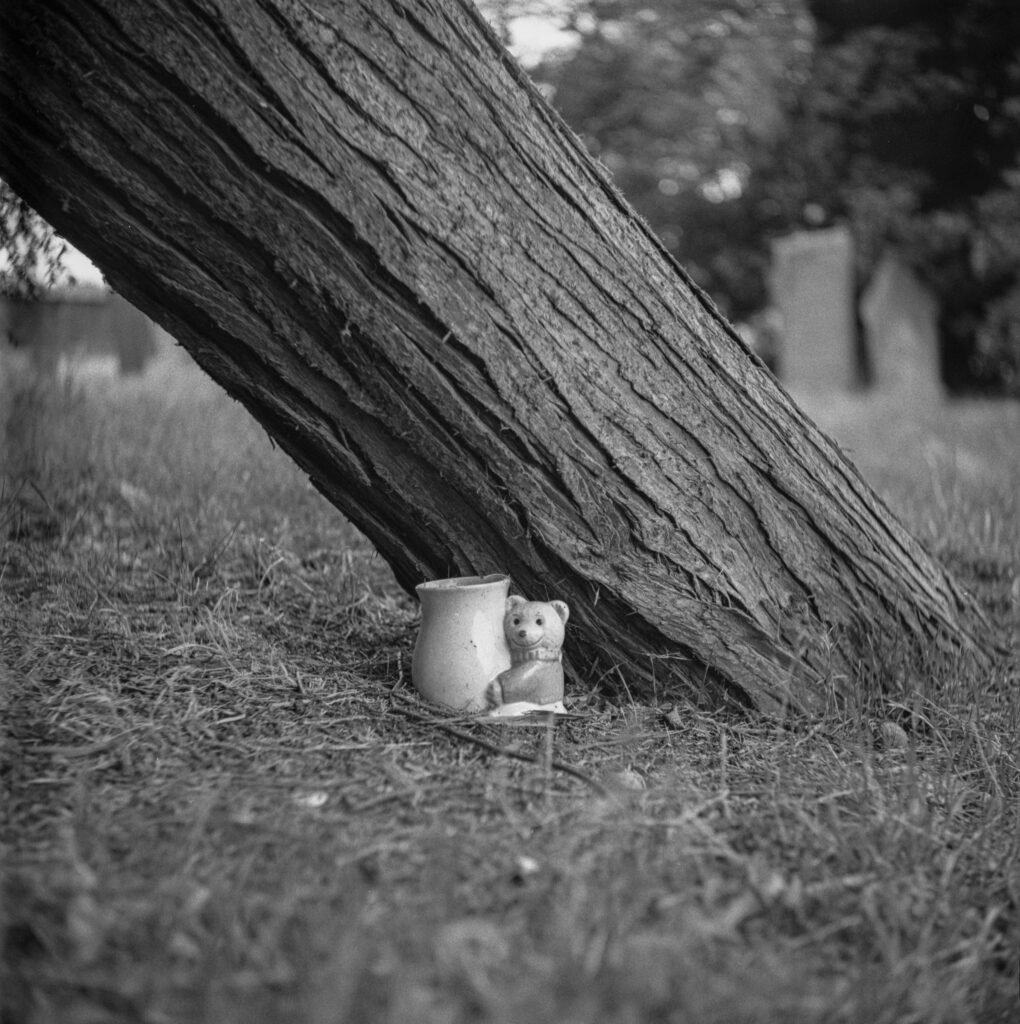
I set out with the intention of trying to improve my landscapes and other still life shots. I don’t know whether I made any real progress but the results were notably better than the first roll I put through the Yashica and the speckled skies were gone following a decent dust clean up.
In use, the Yashica is an absolute pleasure to use once you acclimatise to everything being mirrored in the viewfinder. This is extremely odd at first as nothing moves in the way you would expect. I found myself moving around to adjust a composure and the picture I wanted would completely disappear in front of me as I’d gone the wrong way.
Once you’re used to this, the waist level viewfinder is really quite special. As you place your head on top of the pop up shade, you are completely absorbed in the image coming through the top lens. The little pop up magnifying glass enables you to get focus absolutely spot on for every frame and even those I ended up rejecting were still in focus. The finder screen also has some really handy red lines on it which can be used for composure, just another nice touch in a really well thought out camera.
Shooting an image is a three stage affair. First, remove the lens cap, shutter cap (yes, it has one) and open the view finder. Second, compose the image using the finder and check focus with the magnifier before getting an exposure from your light meter. Finally, dial in aperture and shutter speed, wind the shutter lever down and fire the shot. The whole process is surprisingly satisfying.
The film winder is designed so you can’t accidentally move the film without having exposed it first. Better still is that this is one of the few medium format cameras I’ve seen which doesn’t use the little red window to show which frame number you’re up to. There is a proper frame counter and the camera automatically locks the winding knob out when enough film has moved for the next frame. Little touches like this make a big difference.
Conclusions and learning
Shooting medium format, regardless of the camera used, is an entirely different experience to 35mm. On the face of it that sounds quite absurd, the output of both processes is the same – an image is created. In use, however, the differences are instantly apparent. From the outset, the physical size difference of 120 film means you benefit from larger, clearer viewfinders, bigger controls and a feeling that you are more in touch, more absorbed by the images you are creating.
Of course, the downside of the bigger film size cannot be discounted. Medium format cameras are all large, heavy and often bulky meaning they’re less than ideal for travel or in terms of portability. They require more thought and, at risk of using the worst pun ever, composure to use. The limited number of shots per roll usually culminates in a decision not to take a picture, rather than firing the shutter when in doubt as I might with a 35mm camera.
Having used a few medium format cameras, the TLR system makes the most sense. Unlike a folding or box style camera, the build quality alone makes you feel like you’re using a better device. On top of this, there is no escaping the obvious advantage of accurate focus. Every camera needs to provide an accurate method of previewing the focus point of your chosen scene. Without this, there is an unavoidable feeling of poking around in the dark, followed by the disappointment of seeing a blurred image when you reveal the roll out of a developing tank. I’ve lost count of the times I’ve forgotten to set the focussing distance on my Voigtlander Bessa, destroying many shots that would otherwise have been fine.
Until now, I’ve used medium format as something as a curiosity, the lack of feedback from the camera has always been a stumbling block for me along with the very expensive learning curve of 8/9 frames per £5 roll of film. Buying a Yashica has changed all that. I now feel like I’ve got a photographic tool, something I can really use to learn and embrace the quirks and benefits of medium format. In only two rolls of 120 film I’m already better than I used to be (which isn’t difficult) and ready to throw another roll in and have a go at improving further.
If you have any plans to move to medium format film, do it – but do it properly. For probably the first time, I cannot recommend that anyone should try this on a budget. Cutting corners and spending less will, in my opinion, probably lead to disappointing results. 120 film is an investment in both your time and patience, as well as your wallet. You’ll need new developing kit, new scanning kit if you use a flatbed or similar and a new found patience for learning everything you knew all over again.
But, trust me, its worth it.
Share this post: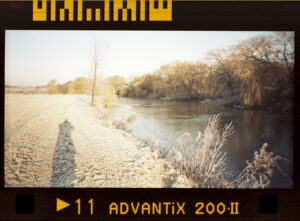

I have two old cameras, a Yashica and an OMO that belonged to my late father. I thought to get in touch
Tim
Hi, great review. I have just taken the plunge into medium format myself. Infact as I write this, I eagerly await the delivery of my first roll it 120 film( like an excited child may I add). I got my camera from eBay too, the seller was a collector but had never used the camera so un tested and without the ability for return ( no returns excepted) I made a cheeky offer of £30 and he was accepted.
The camera is in a reasonable condition, obviously well used in its time with a few scratches and about twenty years of dust inside but this was easily cleaned out. The shutter was sticking on long exposure settings but this again was easily rectified with the help of a very useful YouTube video.
Can’t wait to get a film in it and have a play.
120 is awesome but it’s an expensive learning curve – 8 shots and you’re done!