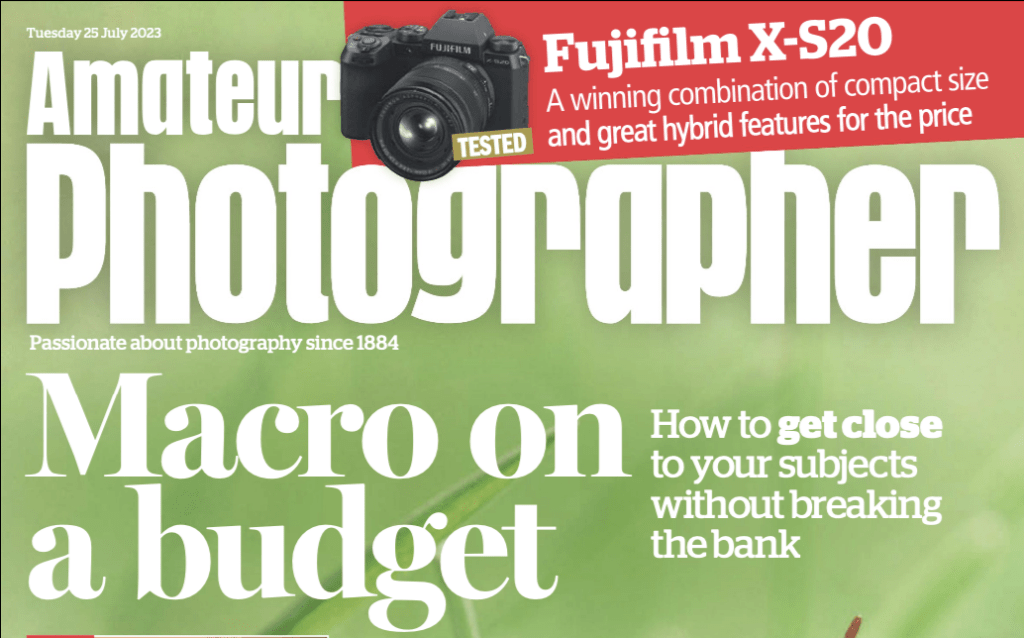
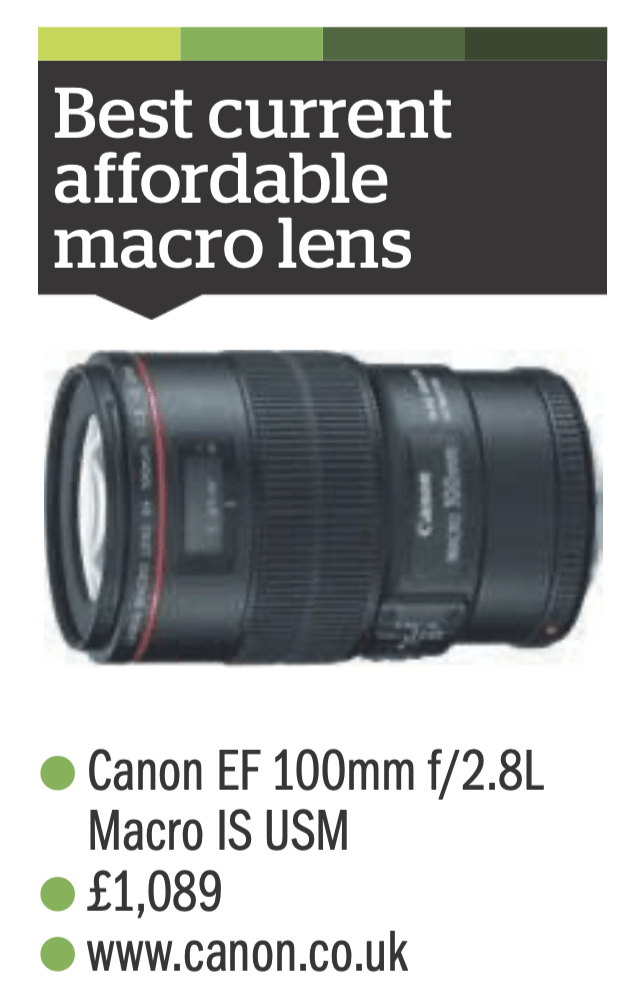
A few weeks back, Amateur Photographer ran a front cover special about shooting macro on a budget. “How to get close to your subjects without breaking the bank” the cover screamed. I turned a few pages to find that not breaking the bank was £1089 for an “affordable” lens. I’m beginning to think that the term budget has shifted in meaning from “I really don’t have much money at all but want to do this” to just simply “an amount of money.” Every time I see one of these articles, whether on a website or in a magazine, the “budget” they’re talking about is many hundreds if not thousands of pounds depending on the items in question. To me, this isn’t budget, it’s not even close to being budget.
I understand that low prices are relative to their original asking prices, but I wouldn’t term a Leica which cost £6000 new and is now selling for £3000 to be a budget camera. Being a photographer on a budget that would make the average pocket money allowance look like a kings ransom, I thought we could do better than this – much better.
With a whole £10 at my disposal, I set out to find what kind of macro fun can be achieved on a shoestring.
In this article:
- The challenge ahead
- When is macro not macro? Going shopping…
- The budget set up
- Can we do better?
- The true cost
- Conclusions and learning
The challenge ahead
I should be totally fair and transparent here, the £1000 option wasn’t the only suggested way of getting in to macro. However, neither lens option was cheap for someone who just wants to have a dabble with the genre and see where it takes them. Here’s the two suggested lenses from the feature:
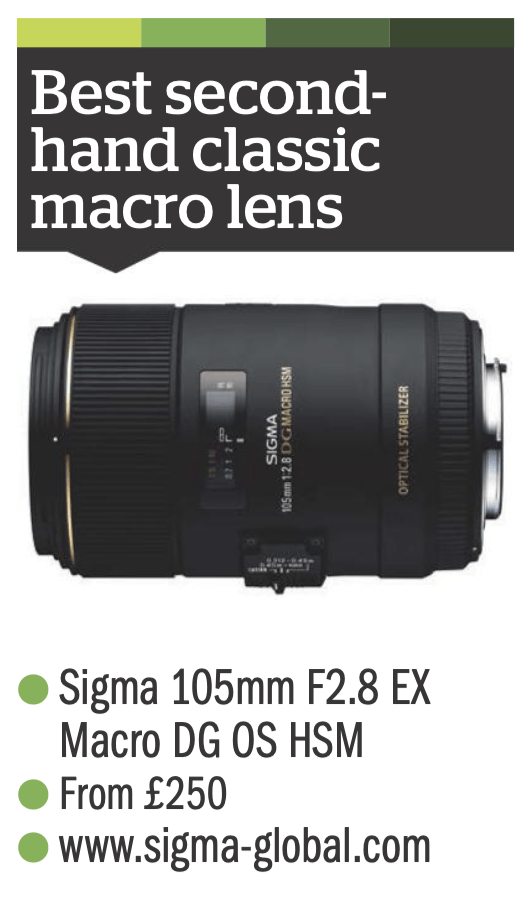
Current second hand prices put the Sigma at about £175 for Nikon mounts and £200 for Canon. That’s not an outrageous amount of money but still not “can of pop and a bag of chips” money.
Ah, wait a minute! You may be saying. But what about magnifying filters, extension tubes, reversing rings?! Indeed, all of these were covered and the extension tube option was £129, reversing ring £349 and the magnifying filter was £70 but needs to be used on a macro lens in the first place.
Why were the extension tubes so expensive? Because they were Kenko, one of the most expensive photography brands out there. Why would you recommend these in an article on budget photography? I get that the £15 Chinese copies are poor build quality, but to suggest you need Kenko because they have “electrical contacts” (some wires) so AF works is not exactly the most convincing argument. A decent, well built set of tubes can be had for less than half of the Kenko recommendation. This lack of contextual thought or research really confuses me.
I am more than willing to acknowledge that there are times when just because you can cut corners and save costs, you probably shouldn’t do it because you’ll end up with terrible results. It was beginning to look like the macro world is one of those things – spend the money to get the right kit and save yourself a world of pain and misery when you get poor photos with your £10 budget set up. Still, I won’t let that put me off.
When is macro not macro? Going shopping…
True macro is 1:1 magnification or higher. In other words, you should be able to focus close enough on an object that it is captured as life size on your image sensor or film. This close focus ability is where the cost comes in – there are lots of lenses that claim to have a macro focus but don’t bring you anywhere near that 1:1 scale that you’re after. I already had a couple of Canon lenses that have this very feature and I can confirm they are not even close to being macro.
Where to start with the shopping, then? There are a few options we could consider:
- An actual macro lens
- Reversing ring
- Extension tubes
To keep costs down, the older the equipment the cheaper it should be. I have a cupboard full of FD lenses and cameras so that’s a sensible place to start. Extension tubes for Canon EF lenses are not expensive on eBay if you’re prepared to buy from China and accept less than stellar quality. They also come with pass through pins that should mean the auto focus and aperture still works but your mileage may vary with these.
Reversing rings are the absolute cheapest option you could possibly go for. There are a couple of downsides to this option as you will lose all control over the lens, aperture setting and so forth and also you’re shoving the back of your lens into your subject which might not be the greatest idea. They’re a little more restrictive than I’d like so I dropped the idea fairly quickly.
Finally, actual macro lenses are all well out of our price range. You may well get extremely lucky if you’re very, very patient and this is possibly the best option if you’re not in a hurry. Putting a few common searches set to auto alert you of new listings is probably the way to go here and then just stick to your guns and don’t go over the amount you’re willing to spend.
The best option, therefore, looked like being extension tubes. I could retain control over aperture, use a range of lenses and get a bit of flexibility with the levels of magnification that each tube will give. I found this set of robust looking FD extension tubes for £7:
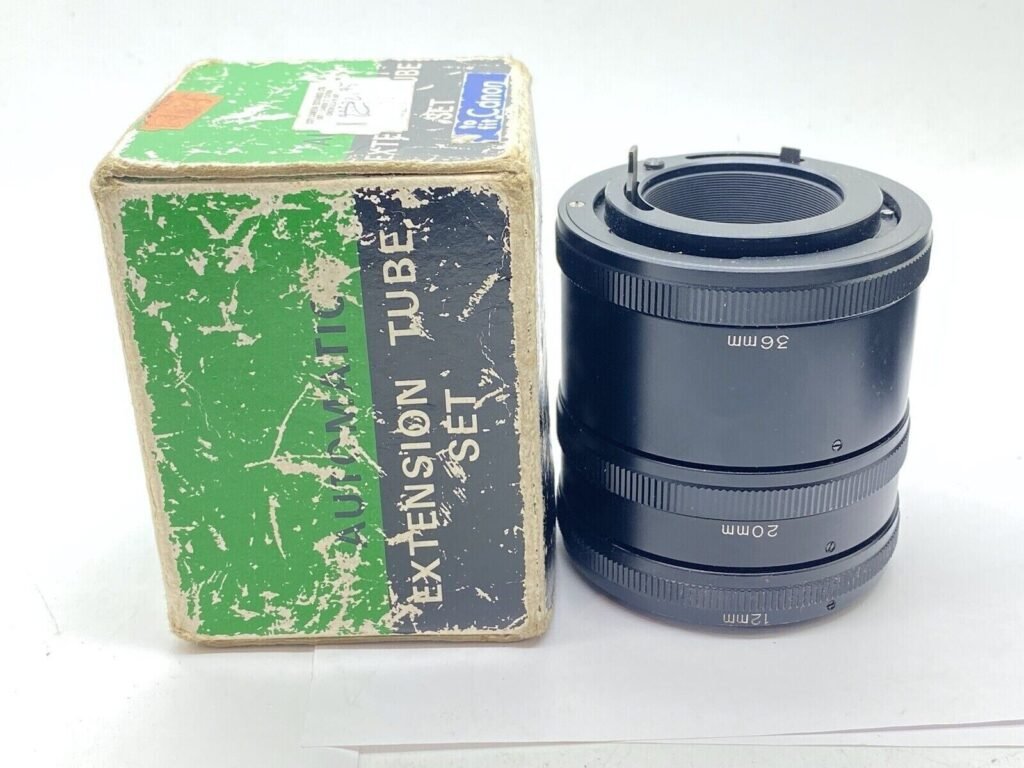
I chose to go down the FD route as I own far more FD lenses than anything else and nearly all of those are primes which would give, I thought, more options in terms of clarity, ease of focussing and overall sharpness. The three tubes together gave a total length of 68mm which is reasonably long and gives a better than 1:1 ratio on a 50mm lens. Now all I had to do was wait for them to arrive.
The budget set up
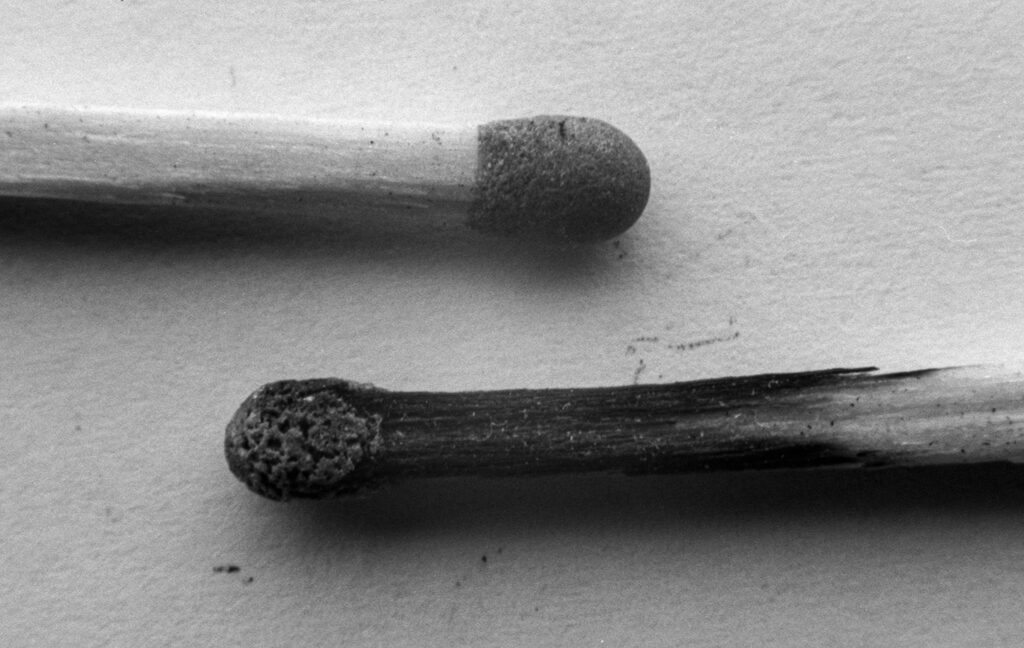
I loaded up a Canon T90 with a roll of Ilford PanF+ ISO 50 film and set about trying to find something to photograph close up. I used all three tubes (because if you’re going to do macro you might as well go all out, right?) and a 50mm f1.4. I have never shot macro before and consequently I was quite surprised to find out just how close you have to place the lens to the subject in order to obtain focus.
If you’ve never shot macro before, focus is utterly mind boggling at first. You have a depth of field that can be measured in fractions of a millimetre and your entire focus range on the lens accounts for approximately 5mm in the real world. I arrived at a technique where I put the focus ring in the middle of its range, then I’d crank the tripod height adjustment roughly to be in focus and lock that down. From there I could use the focus ring on the lens again to make finer adjustments and get the final image. I didn’t have a cable release for the shutter so used the self timer to try and avoid camera shake when taking each shot.
Looking at the depth of field through the viewfinder I could tell that a reasonable aperture was going to be necessary, I started out at around F11 and quickly decided to just go to F22 in order to maximise what little depth of field there was.
Having tried out the 50mm, I moved outside in search of other things of interest and on to a 135mm prime so I could move a little further away from subjects. You learn all the time trying something new and I quickly discovered the rule that shorter focal length lenses get you much larger magnification, but with a 28mm lens you are quite literally touching your subject. Longer focal lengths give you some breathing space and move you back, but you sacrifice magnification. It’s a trade off between how close you can physically get and how much light you inevitably block out with your massive lens touching a tiny subject.
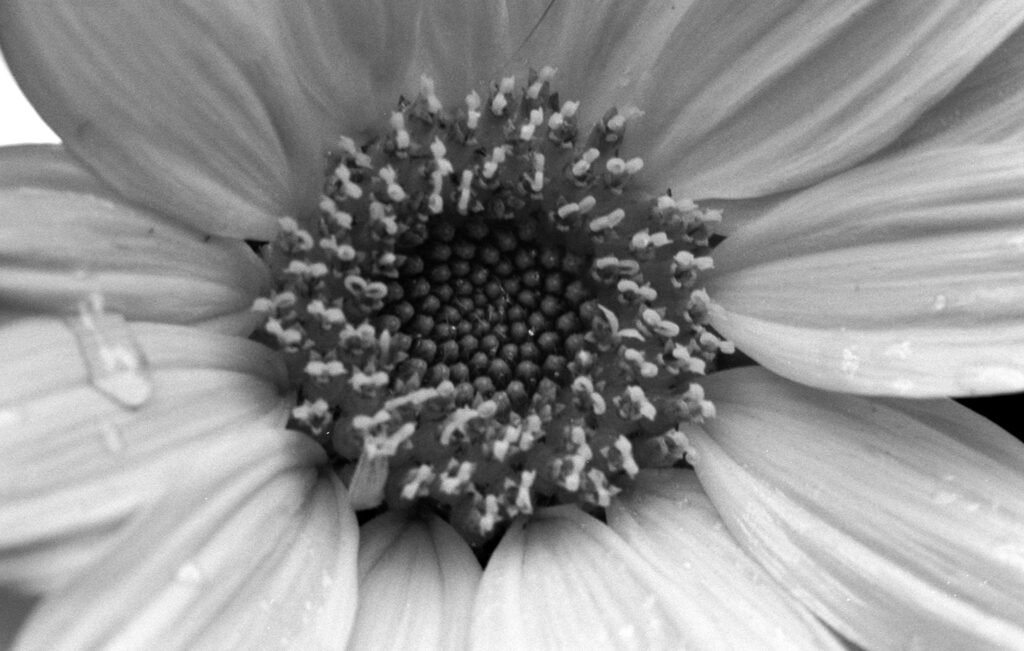
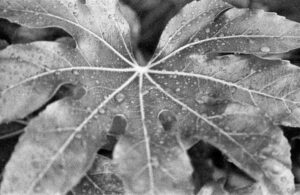
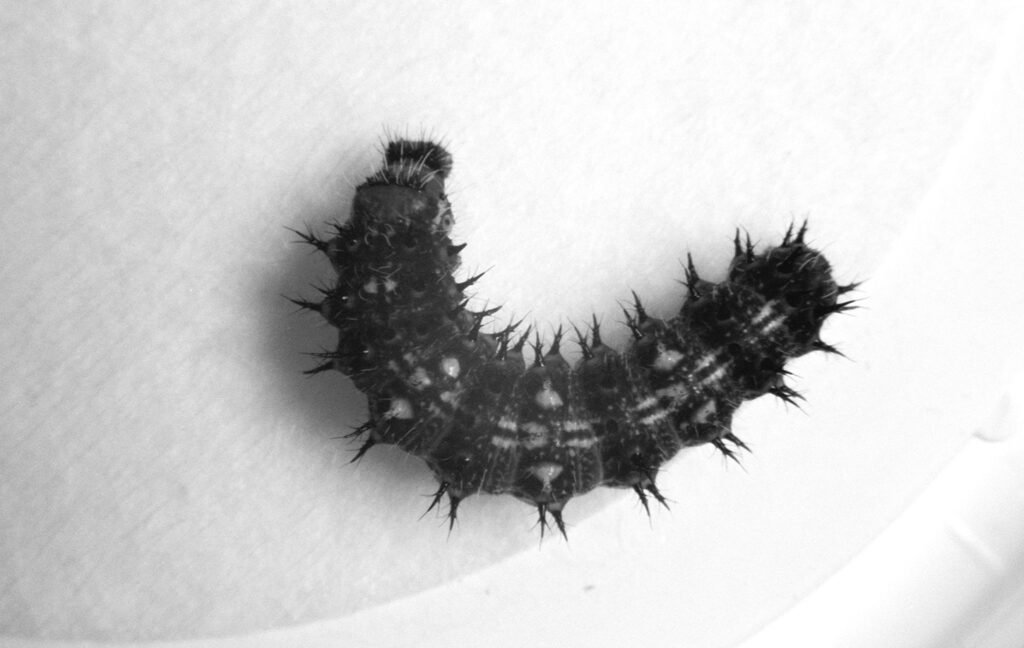
The garden was the next source of subjects to shoot and I went for the obvious flower pictures. This worked out fairly well until the wind started blowing which causes a significant problem when you’re shooting at a shutter speed of 1 second per frame. I quite like the image above but I do wish there had been enough depth of field to get the water droplets in sharp focus too. Movement killed off all of the remaining pictures I took outdoors, I needed another method of achieving relative calm and it was then I remembered the bodge job light box I’d constructed out of a ceiling light and a few bits of wood…
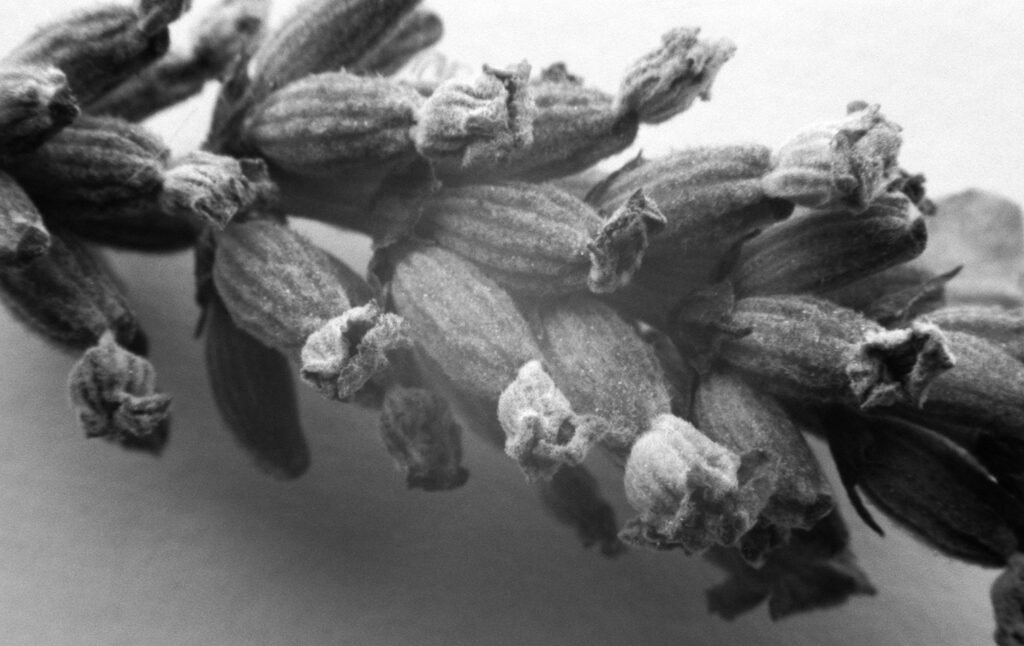
Having a stable platform and light source to shoot from made life so much easier. It did introduce one problem, though, and that’s a bright spot in the centre of every frame. I don’t know why this happened – whether it is a consequence of using F22 apertures, whether the light source was for some reason more intense in the centre or some other reason. It’s really quite annoying because there were some nice shots that came out and they’re all suffering from this bright patch in the middle.

This image of a 20p piece is probably my favourite from the entire roll. I used a 28mm lens which gave a distance of about 10mm from the coin to the lens itself, but resulted in some seriously impressive magnification. The level of detail captured here is quite striking considering the age of the equipment being used and the use of film.

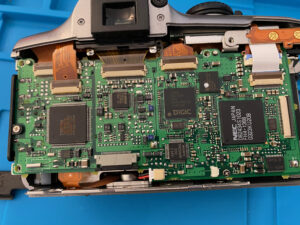
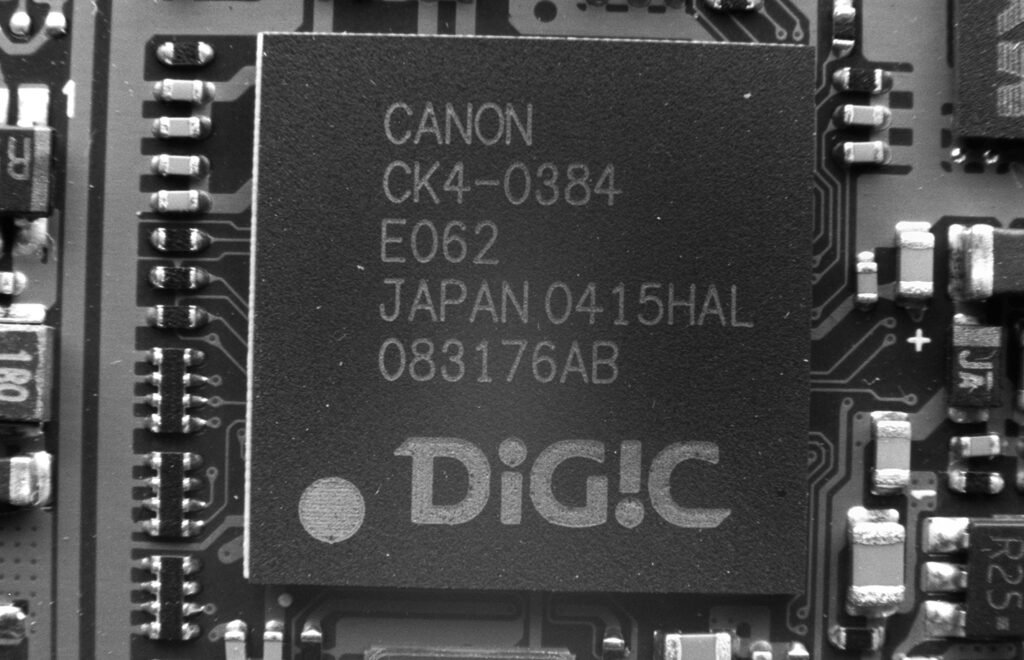
I’m currently in the process of turning a 300D into an infrared camera, if only I could find a piece of 2.7mm thick glass I’d be well on my way. I thought the main circuit board of that camera would make for an interesting couple of shots, and it does except for those pesky bright spots again!

Can we do better?
No. Not for £10.
This is perhaps a small exaggeration. The correct question to ask is “did I make the correct choices?” and the answer is the same – no, probably not.
There is no compelling reason to have chosen to shoot this as a film project. If I’m being brutally honest, the driving factors were choice of cheap lenses that I already had and the fact I had a roll of ISO 50 film and no idea what to do with it until this point – it seemed like a good idea.
What did I get right? Extension tubes. If you want to shoot macro on an actual, real, budget budget then you have one choice and extension tubes are that choice. You will retain control over your lenses and in the case of more modern equipment, you should even keep control of auto focus which would be of huge assistance when your depth of field is almost non existent.
There is no doubt that I’d have achieved far better results by going down the digital route. Why? Because:
- I could’ve taken advantage of 1.6x crop sensors for even greater magnification
- Adjustable ISO would’ve boosted shutter speeds
- Much easier to focus
- Ability to adjust RAW files to compensate for mistakes
- Fixing that light patch issue!
The advantages of digital in this situation are numerous. Furthermore, the cost of extension tubes is well within our pocket money budget. Even if your cheap, Chinese Kenko copy tubes fall apart after five uses you’ve lost almost nothing by giving something a go. If you love it, then investing money is an easy choice.
The true cost
We probably shouldn’t ignore the fact that if you get into macro you’re probably going to want to buy a flash to increase the shutter speed an enable hand held shots which have better lighting. You can pick up second hand flashes for reasonable prices, I don’t know if the little pop up flashes would work at all in this situation.
This whole exercise makes one rather large assumption and that is you already own the rest of the equipment necessary to clip on some extension tubes and off you go. The minimum you need for macro is a camera, lens and tripod. I used a charity shop special tripod that I picked up for £6. It’s not great but it isn’t the most flimsy thing I’ve ever seen either – these do appear frequently in these kinds of shops so it’s worth looking around for a cheap one to get you going. The dreadful Facebook Marketplace might help as well, tripods don’t really retain any value unless they’re genuinely good ones like a Manfrotto.
I think it is more than fair to assume that anyone looking to shoot macro would already have a camera and therefore a lens. Pretty much any lens will do for a first shot at macro – even the classic 18-55 kit lens should do you for a few experimental shots. However, there are some people who will be using compact or even mobile phone cameras.
I did try out those clip on lenses for macro on mobile phone cameras and they do work to an extent, you can have a lot of fun with them for less than £5 so don’t count that out if all you want to do is take some cool close up shots of something.

I do think that an SLR is the only way to go if you want acceptable or pleasing pictures from your macro endeavours. We’ve looked many times at cheap routes into digital SLR’s before and there are lots of options out there which would get you going for £30 or less. If you’re super lucky, you might even get a kit lens thrown in for that amount, but even they are not super expensive on the second hand market. If you truly started out with nothing then you could buy an entire camera, lens and tubes kit for £60-70, which is less than the suggested set of extension tubes in Amateur Photographer.
Conclusions and learning
Can you make great macro pictures for £10?
Yes.
Should you do it with a bunch of old film gear?
No, probably not. Not unless you’re weird like me and enjoy making life more difficult for yourself than is strictly necessary.
I think what we’ve proven here is that budget means very different things to different people. Perhaps my interpretation of the term is now more commonly known as “thrifty.” Either way, it isn’t correct to suggest that macro on a budget means spending £1000 on a lens, or even £200 on a second hand macro specific lens.
You never know whether you’re going to be captured by a genre of photography. Just because you enjoy landscapes, for example, doesn’t mean you’ll be taken in by macro. Indeed the time, patience and level of calm required to get decent macro images may well be beyond the tolerance of some. To invest hundreds, let alone thousands, on equipment when you’ve no idea if you’ll enjoy it is a lot to ask, especially today when most people are flat broke.
I believe there’s an element of responsibility when articles are published in trusted sources or on popular platforms. Of course, Amateur Photography wrote a compelling feature, they considered many viable and high quality options which could be considered budget in the context of the much higher price tags of “professional” grade equipment. However two things really grind my gears about this particular feature and that is the token gesture that has been paid to actual research in to real world options, accurate pricing and the complete ignoring of a “true” budget option for people who are priced out of even spending a few hundred. Moreover, to suggest such high profile, high price brands as Kenko in your recommended alternatives list is beyond comprehension. I’d wager most “budget” oriented photographers might start with a search of Amazon or similar – why not test out a few truly cheap options and let people know if it really is a budget bargain or a complete scam?
So yes, I’m here to confirm that you can do macro on a real, true budget of next to nothing and you’ll have a great time doing so. You’ll get better images than strapping a clip on lens to your phone and you’ll learn a lot on the way. The only problem for me is I have an audience of about 5 people, whereas Amateur Photographer will hit tens of thousands. Perhaps I should write to them for a job…
Share this post: