
A while ago I wrote about upgrading my film scanner from a Canon 4400f to the Epson V600. I was, and still am, very happy with the quality of scans it produces. However, I’m here to tell you that I utterly, utterly failed to understand how to actually use the Epson properly and have, for many months, been ruining all my scans.
I’m normally someone who will dig around software, investigate the options, learn how something works properly. I didn’t do this with the Epson, I think I’ve become so accustomed to the plug and play, one click mentality that the thought never really struck me that there could really be a huge difference between the manual settings and the auto exposure. One thing I can say for the Canon is that the software did a really good job of giving balanced scans with a decent tonal range so I got used to just trusting the scanner to get it right first time. Whatever the reason, these are all excuses. I’m here to tell you that if you have an Epson V600, you need to change how you scan with it.
The clues were there…
The evidence that something wasn’t quite right had been there all along. I’d often noticed that many scans seemed to be over exposed when they arrived in camera raw. I could recover quite a lot using the various RAW tools and made the assumption that this was down to the fact I use so many different cameras which are cheap, knackered or older than I am that the exposures could quite easily be off. This is a fatal error, film has so much latitude for exposure that a camera actually blowing the highlights due to a duff meter would be so obvious that most of the picture would be a mush of white. Since learning to scan properly, my eyes have nearly fallen out of my head on several occasions at just how much headroom film has for capturing super bright highlights and detail in shadows in the most contrasting of scenes. Film has HDR mode built in.
Other than blown highlights, I’d not really noticed too many other issues with the images I’d been producing. There was a niggle with some images appearing to have more obvious grain than I’d like, but I’d put that down to the film I’ve been using. You’ll not be surprised to learn that I’ve changed my mind about that, too.
How to scan properly
I don’t know what triggered it, but after scanning my latest batch of film in, I decided to go back and do it again. This time, I previewed the frames and then hit the “reset” button to remove all automatic settings that had been applied. At first, your preview looks absolutely awful, but don’t panic as one single change is about to fix the whole thing and its all in the histogram.
For reference, here’s a default, unedited scan from the v600:

It doesn’t look too bad at first, does it? Take a look at the bag he’s carrying and the T shirt of the guy on the right of the frame – there’s a lot of detail missing here. Also, the guy checking the time, his face is very much lost in shadow. A quick run through photo raw can recover a lot of this but at the cost of added grain to the image. Have a look at the before and after comparison below.


Honestly, I think this looks awful. It was this image that made me consider if I was doing something wrong with the whole scanning process. I really wanted this picture to work and the post processing results were too grainy with an obvious loss of detail and harsh areas of contrast after trying to recover the shadow areas on the main subjects face. So, how do we fix this?
Step one is to generate the preview as normal and then hit the reset button to clear out all of the automatically generated settings.

Now we need to have a look at the histogram, by default the highlights and shadows will be in the middle of nowhere like below, moving the limits to each edge of the histogram will ensure we capture all of the detail in the negative, nothing more, nothing less. A word of warning, it won’t look good in the preview but that’s what camera raw is for later on.


Now scan the image with no other changes. The initial preview will look fairly awful but there actually isn’t a great deal of changes to be made in camera raw to fix the final image. The comparison slider below shows the image as it came straight out of the scanner and then after a few tweaks in camera raw. The difference is incredible, there is now so much more mid tone detail to work with, the highlights are not blown and I was able to recover the areas of shadow without revealing that thick grain and harsh shadow of the previous image.


To really put this in perspective, here’s the edited default scan against the edited scan with the reset settings and histogram tweak. It’s here that you can see the increase in tonal range, the more gradual transition between light and shadow and ultimately the detail that is retained – again, check out the faces for the biggest difference.
I’m not suggesting that I’ve perfected scanning images with this single change, but to achieve such a difference from one minor tweak to a software setting is quite the eye opener. There’s a lot more experimentation to do with future scans and I’m sure there are people reading this screaming “why aren’t you using VueScan!” which is fair enough, other than time and convenience, I don’t really have an excuse for not trying it out – but it’s on the list.
Anyhow, a shorter post than usual and something of a public service announcement for V600 owners. If you’re reading this, consider not allowing the scanner to make its own mind up.
One post script to this, I tried the same technique with colour photos but you end up with a nasty colour cast that doesn’t seem to correct with white balance or other adjustments. I’ve no idea why, I’m out of my depth there!
Share this post: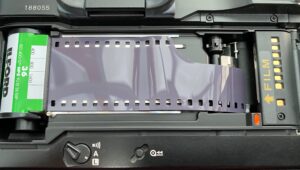


This is very interesting to someone who has used Silverfast with his v850 forever; I took one look at Epson Scan and just couldn’t work it out, but I hear the general consensus is that the Silverfasts and the Vuescans aren’t necessarily the easiest tools to work with. Either way, this is sure to be a welcome tip for those using Epson scanners who haven’t cracked that piece and it’s nicely broken down, especially with those before and after photos!
I have been working in the photo industry for about 50 years. I started when I was in college and I’m now 73 years old. Please Master Photoshop. The tools available in Photoshop are far superior to those provided with your scanner. I say this knowing that photoshop has some glitches that it did not used to have but still it is better than the software provided with the Epson 600 or silver fast. I use the Epson 600 to do my initial scans with but almost always finish off in Photoshop.
yep – my workflow is scan to tiff, use adobe camera raw to make some adjustments and then finish off in photoshop. Thanks for reading!