
Honestly, I don’t mean to do it. I certainly didn’t set out on this particular journey with the intention of doing it. Every time I tell myself that I have enough cameras, enough things to be using, reviewing or repairing, I find something new, completely by accident and it opens up yet another rabbit hole down which I fall, inevitably picking up new kit on the way.
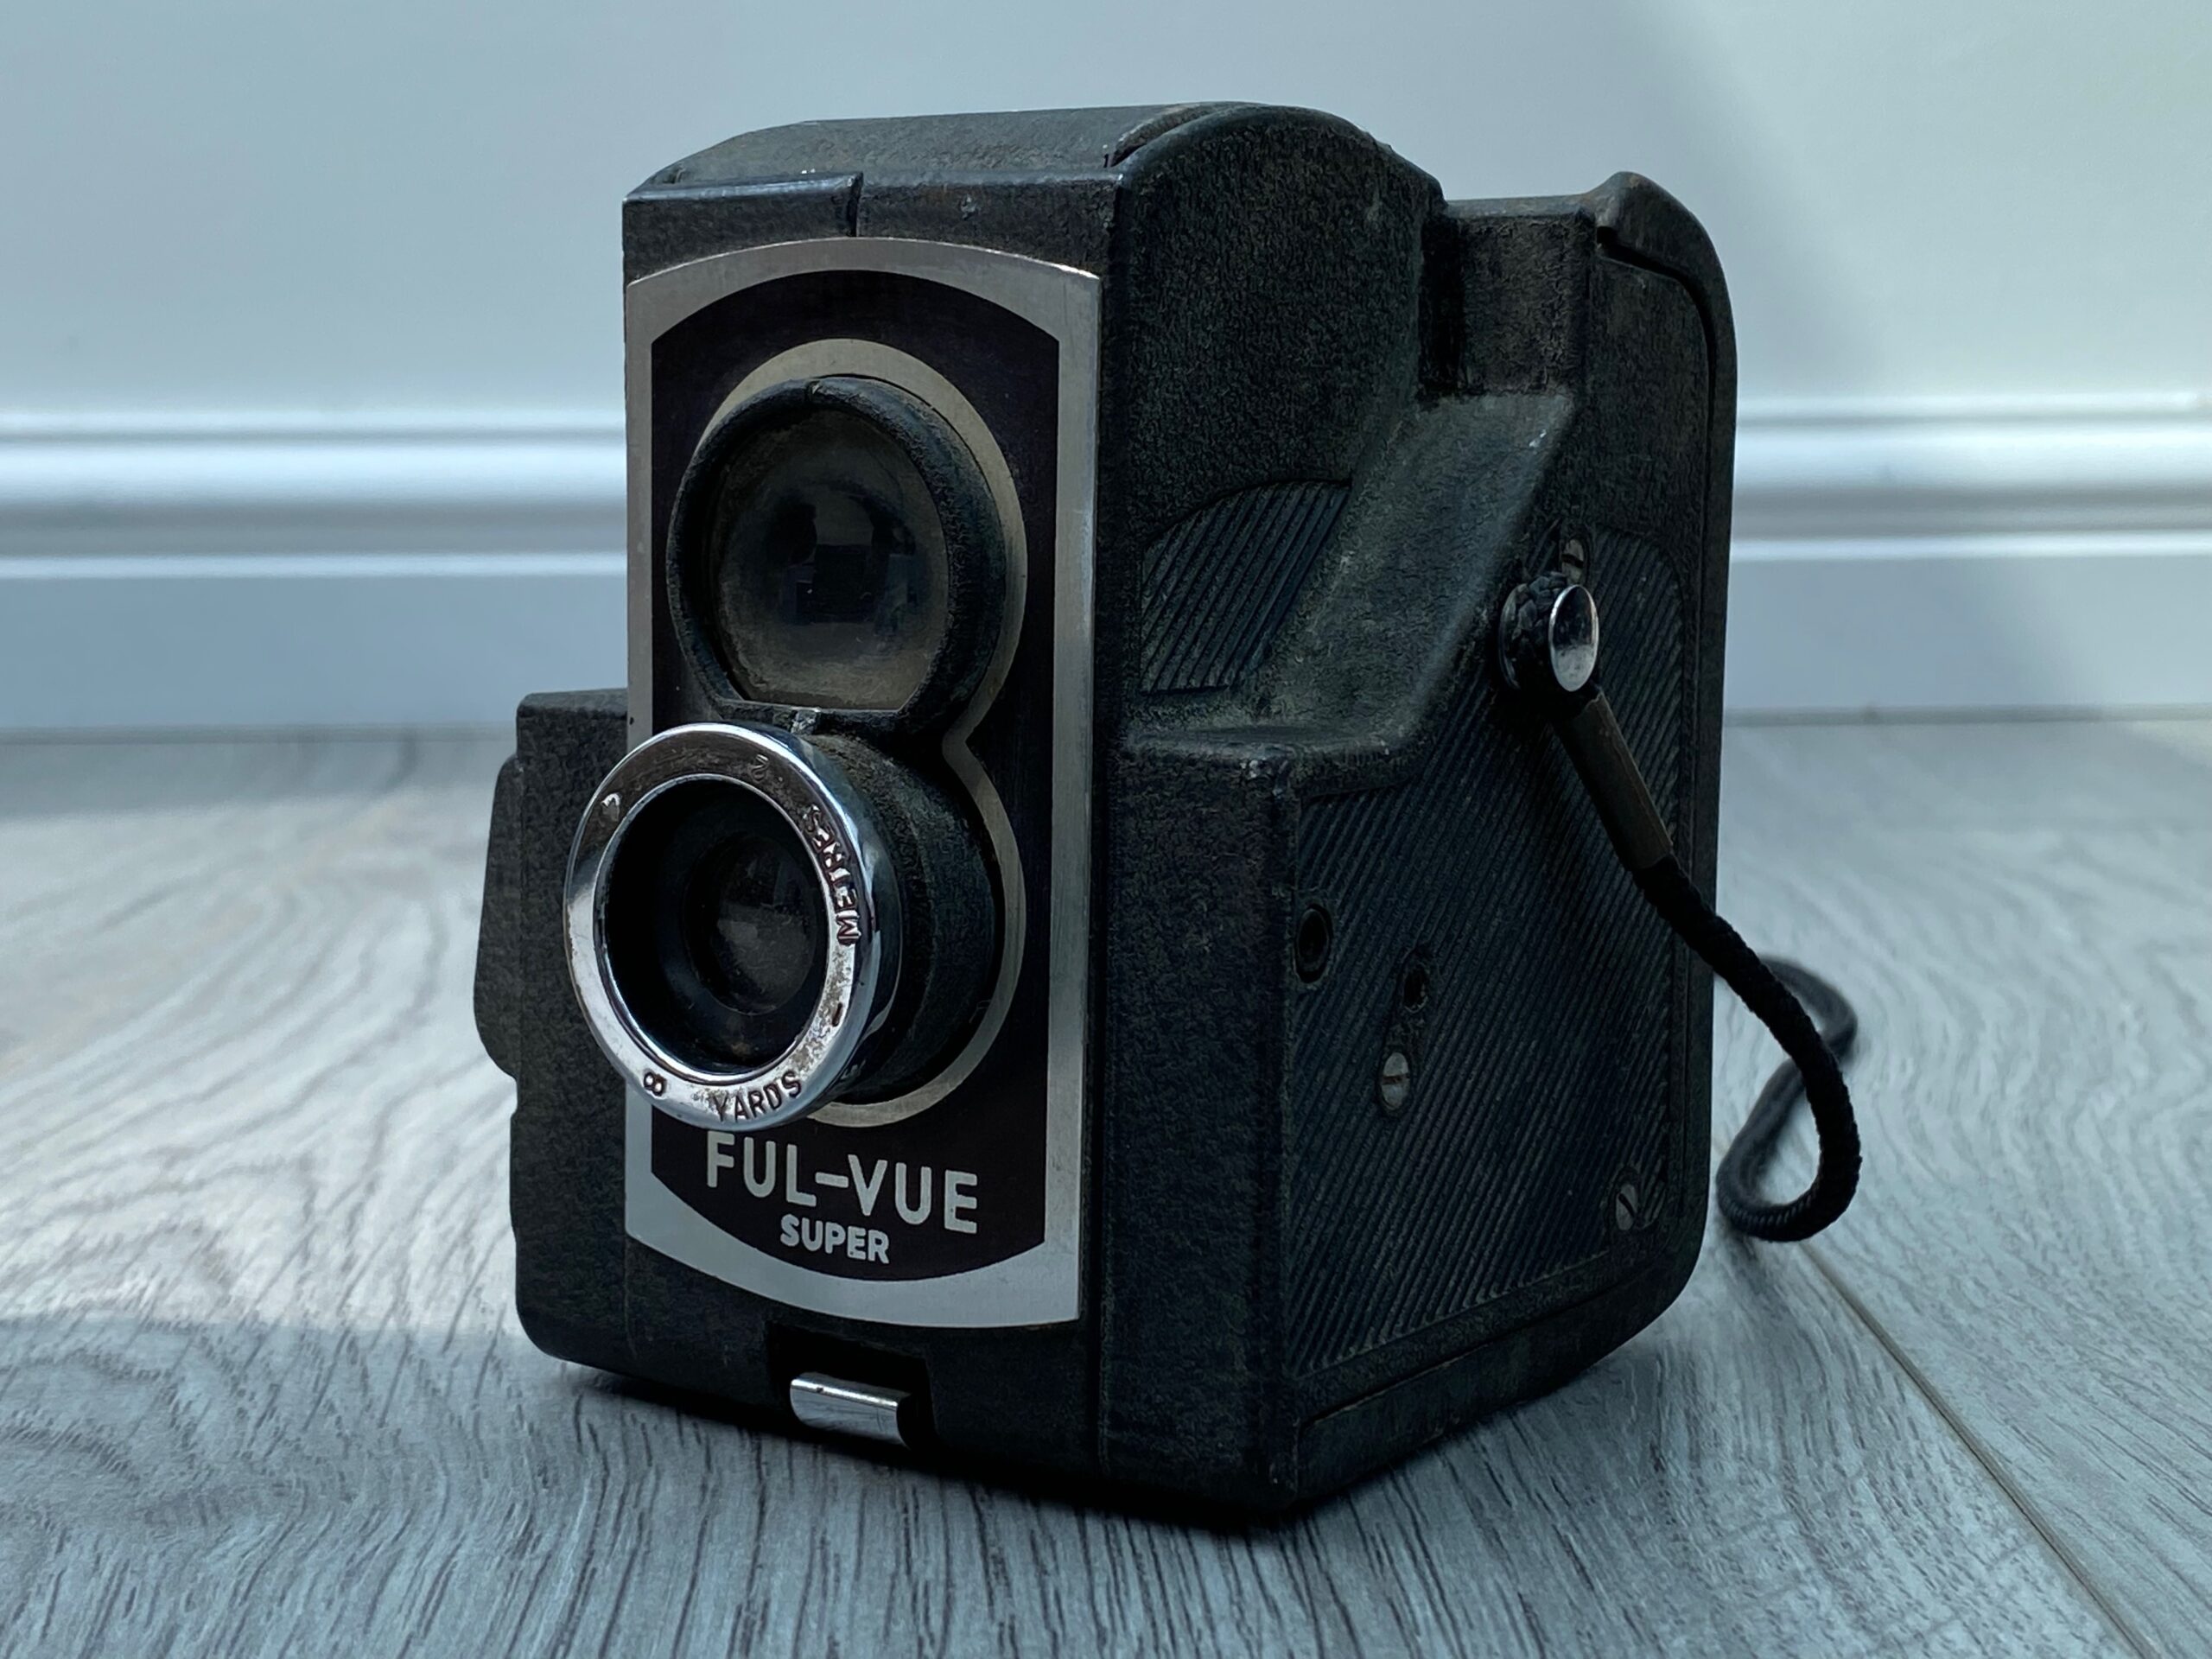
As it was last week when I found myself in an antiques shop looking at a really quaint little box TLR type camera which was crying out to be cleaned, loved, used again. That’s what I told myself, at least. If it wasn’t for the fact each camera seems to cost me between £3 and £20 I’d be stone cold broke.
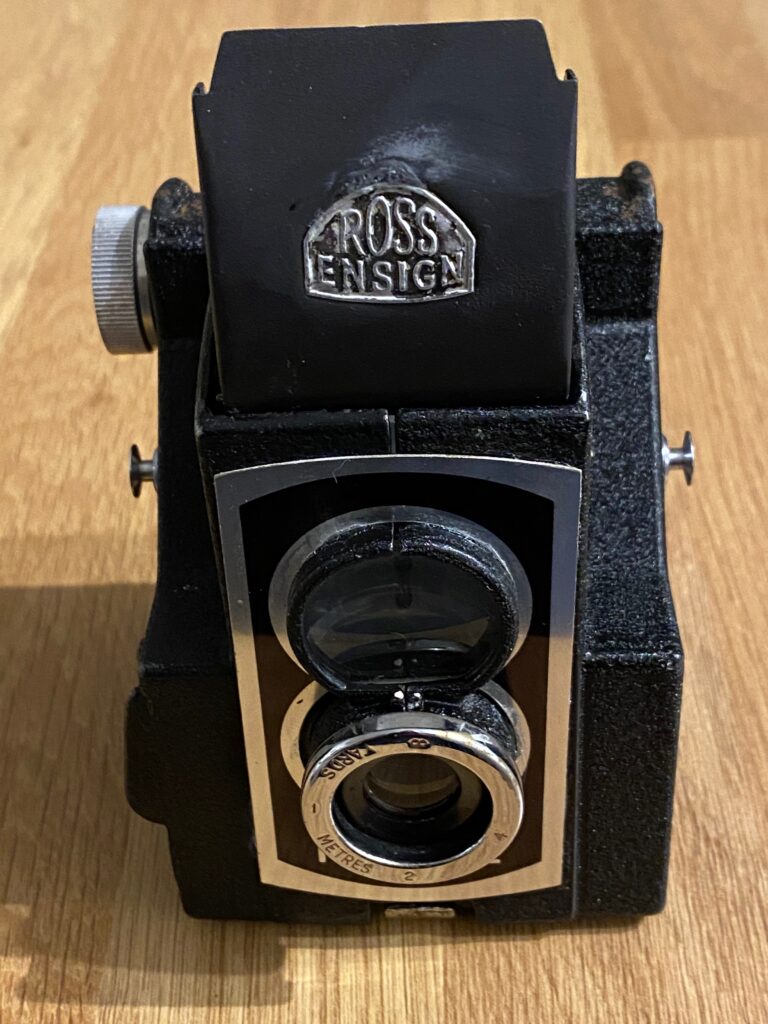
I knew nothing at all about these types of cameras other than they existed. I’d never heard of Ross-Ensign or just Ensign as it appears to have once been. It just looked “cool”, it was £20 and therefore not exactly a large amount to spend and I thought it’d make a really interesting project. I did my best “what is your very best” that I’d learned from Bargain Hunt, promptly got told to sod off in not so many words and so bought it anyway.
What happened next? You know me, nothing is ever simple or straight forward.
In this post:
- Some history
- A complete accident
- What can possibly go wrong?
- Learning, always learning
- Shutter timing
- I am not a professional
Some history
The background to the company behind this camera is quite complex and I’m not sure even now after some research that I fully understand their timeline. According to the Science Museum group, their chronology is as follows:
Founded in 1915 when Houghtons Ltd. merged with W. Butcher and Sons Ltd. to form the Houghton-Butcher Manufacturing Company. Though cameras were still sold under the separate names, the new name provided a common manufacturing base. (NOTE that the two trading companies merged on January 1st, 1926 to form Houghton-Butcher (Great-Britain) Ltd., which was renamed Ensign Ltd. in 1930). The manufacturing company based at Walthamstow kept the name Houghton-Butcher Manufacturing Co., Ltd. until 1945, but the headquarters were bombed in 1942 and the company never recovered. In 1945, Houghton-Butcher Manufacturing Co., Ltd. associated with the film maker Elliott & Sons Ltd. (maker of the film brand ‘Barnet’) and became Barnet Ensign Ltd.
Science Museum Group – https://collection.sciencemuseumgroup.org.uk/people/cp112300/houghton-butcher-manufacturing-company-limited
In 1948 there were further mergers and changes to the company to become Barnet-Ensign-Ross and finally in 1954 becoming simply Ensign-Ross. The Houghton/Ensign-Ross company survived until about 1961 when they eventually went out of business due to diminishing sales.
The Ful-Vue was not just one camera but a range of cameras going back to the 1930’s. The original being the most functional rectangular box you can imagine. This was followed after the war by the Ful-Vue 2 which is a really wonderful looking camera, based on design trends of the time for an exhibition in 1946 called “Britain can make it” which was meant to showcase the bright future of peacetime Britain. The Ful-Vue super came nine or so years later and improved in a few areas and actually regressed in others. Even so, according to Ensign, they sold over a million Ful-Vue’s, which isn’t to be sniffed at.
The end of the company is a fairly interesting story and chimes with failures from modern times. Much like Netscape, Myspace and other companies once valued at millions and now defunct, they have something in common with Ensign – a refusal to believe that new or emerging technologies were either superior or taking over significant market share.
This isn’t something which just happens to smaller or lesser known businesses, Microsoft famously made the same mistake in 2007 when the iPhone came out with their then CEO Steve Ballmer (an absolute nut case of the highest order) actually laughing about it saying he didn’t understand the point of it.
In the case of Ensign, it was the arrival of 35mm film which finished them off. They steadfastly refused to stop developing and producing 120 film cameras. They believed and promoted the fact that 120 film gave much higher quality negatives and prints. They weren’t wrong, physically larger negatives are undeniably better, but what they missed was the opportunity for miniaturisation and the convenience that 35mm offered.
Sadly, in England during the 1930’s, 40’s and 50’s there was a perception that British engineering and manufacturing of optical devices wasn’t as good as their European counterparts, especially German brands such as Voigtlander.
Ensign allegedly threw a great deal of money on engineering and design in an effort to keep up or out perform this perception. In doing so they produced many models which had excellent sales figures, but still apparently lived in the shadow of the perceived quality of foreign brands. It was to be the final nail in the coffin, along with diminishing sales, their previous spending meant there was little left to fund development of 35mm replacement models.
A complete accident
Recently, I’ve become quite addicted to watching restoration videos on YouTube. So much so, that I had visions of buying a lathe, sand blaster and a pillar drill so I could disappear into the garage with a rusty relic for extended periods of time, emerging some time later with something that looks like it has just left a factory.
There’s the dream and then there’s the reality. The magic of these videos is in just how straight forward and easy they make the whole process seem. Their work is the result of many years of experience, learning and above all else – patience. On the other hand, my work is often the result of someone who wants to get everything done in a day and a complete lack of patience. I think we all know where this is going.
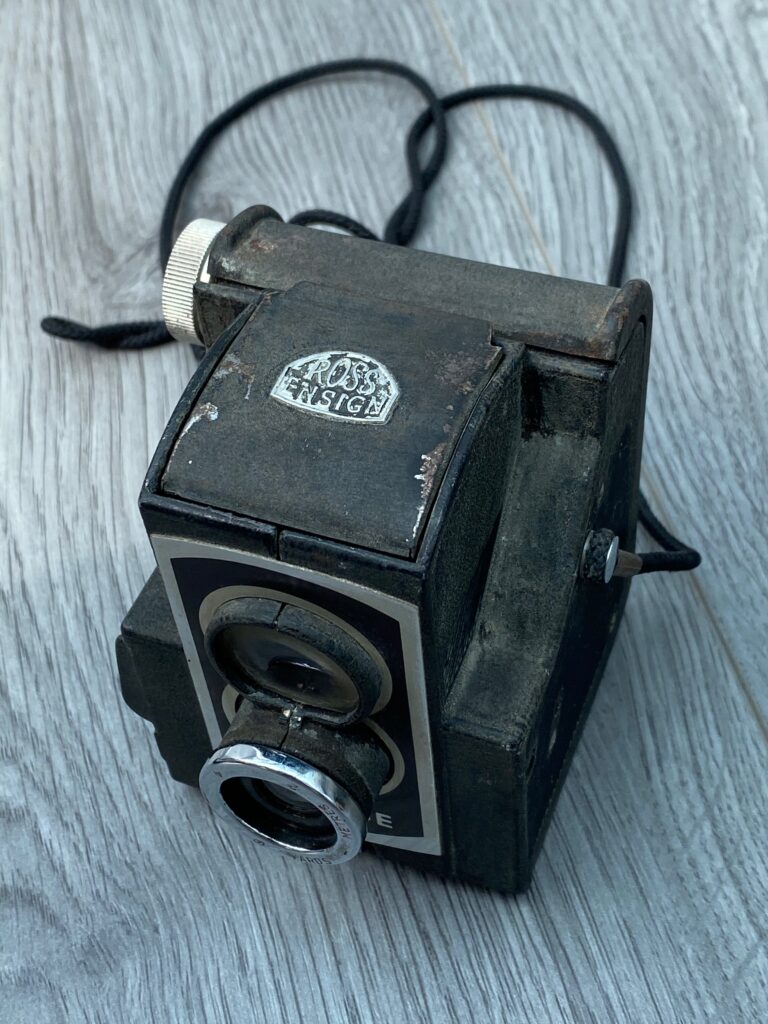
Stood in the antiques shop with a choice of fairly cheap rusty old image making boxes that I knew nothing about, I’d got the restoration idea floating about in my head. Wanting to ease myself in gently to trying my hand at delicate, sensitive restorations, I picked the most battered, rusty one they had with a shutter that didn’t fire. After all, it’s easy… isn’t it?
What can possibly go wrong?
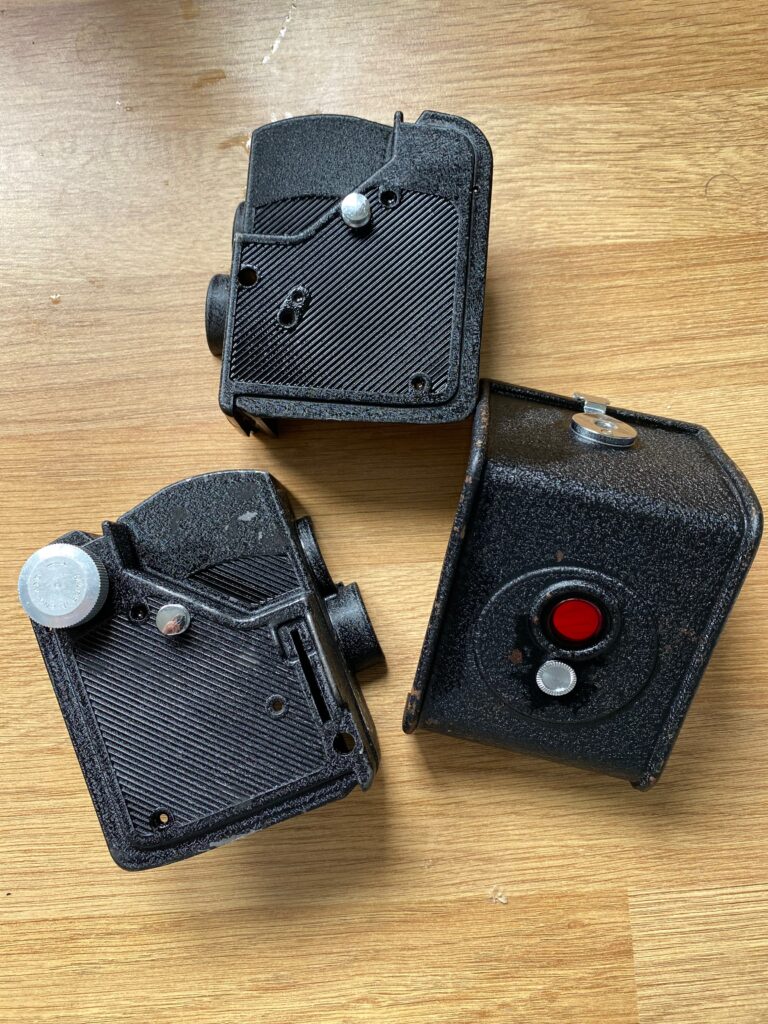
It would be sensible to begin with the problems this Ful-Vue had upon purchase:
- Shutter doesn’t fire
- Both lenses are almost opaque
- Back/bottom cover falls off and isn’t straight
- Viewfinder is opaque
- Generally rusty
- All light seals have decayed
Other than that, it was fine.
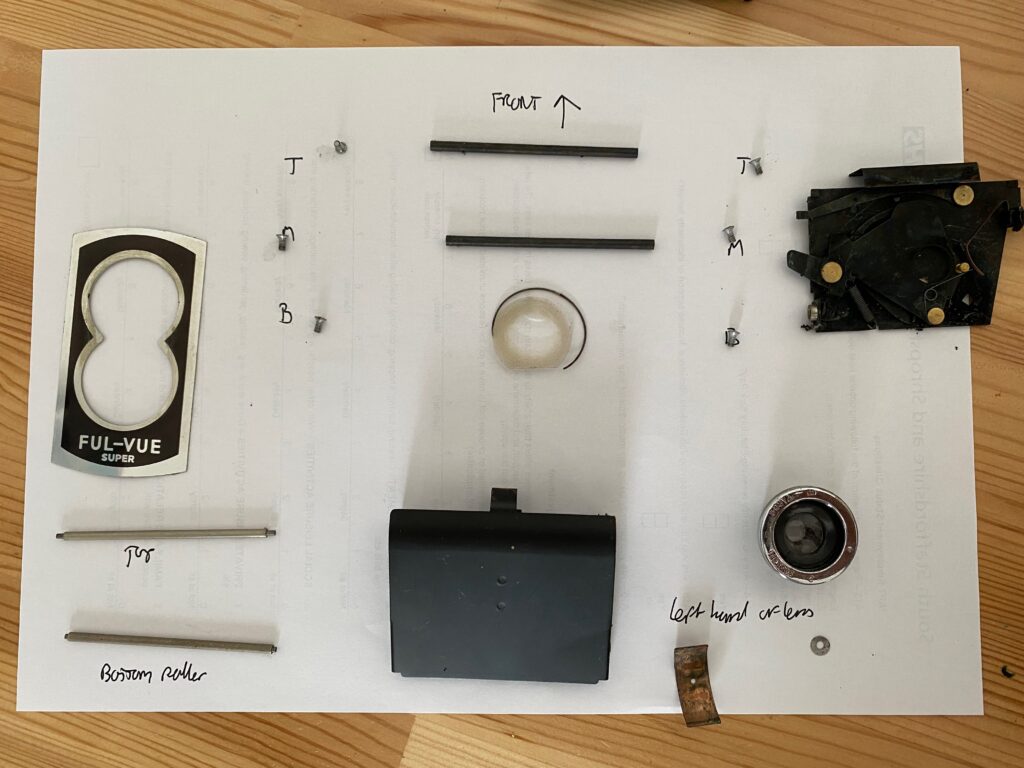
I set about disassembling the body and the construction is deceptively simple. There are only six screws that hold the whole thing together and after carefully removing the metal name plate from the front, it falls apart into two halves.
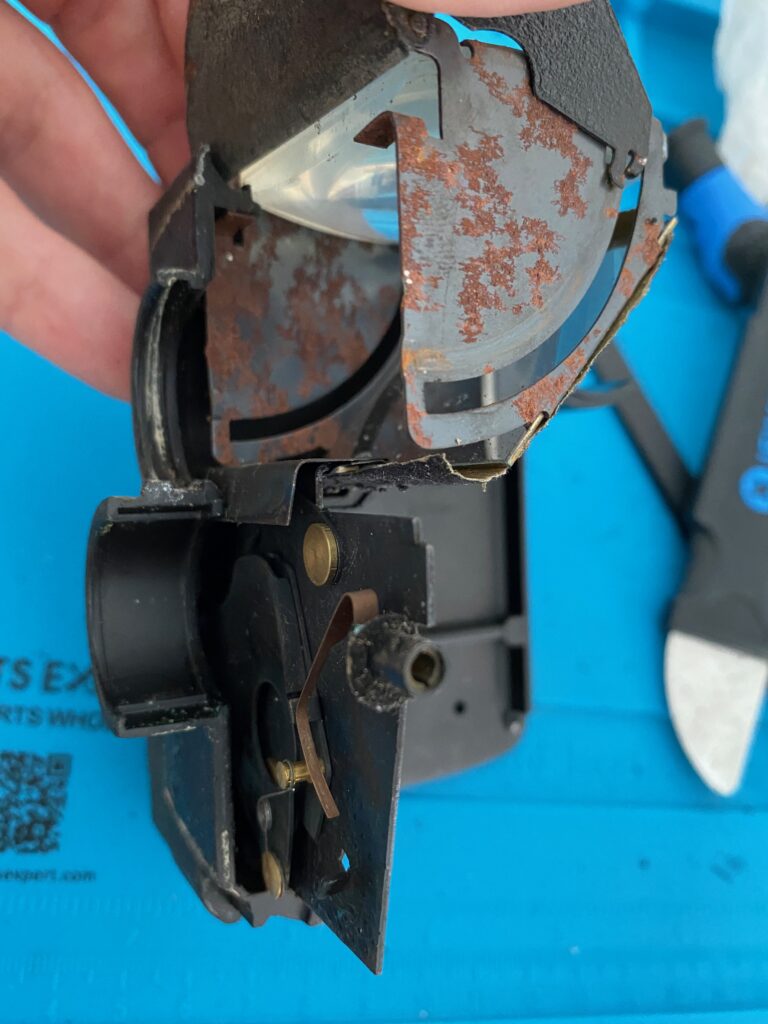
Taking it apart revealed that there wasn’t a single part of the camera that hadn’t rusted in some way. A few parts were light surface rust, others were made mainly of rust. The worst part had to be the mirror/viewfinder assembly which I think I must have sanded for about an hour before it looked like bare metal again.
After sanding for what seemed an eternity, I covered the mirror assembly in primer and left it to dry whilst I tackled the optics.
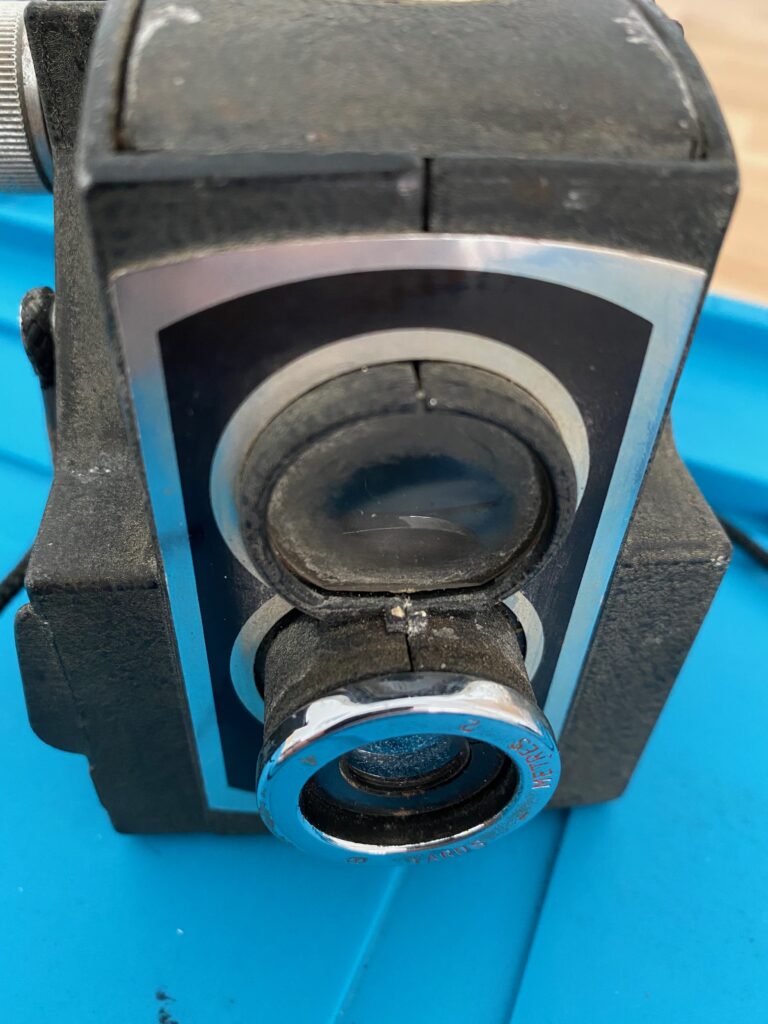
Fortunately, the main and viewfinder lenses came up almost as good as new after an alcohol bath, a fist full of cotton buds and a good polish with a soft cloth. It was quite remarkable how well they cleaned up, before taking the camera apart they were both almost opaque and covered in a weird crusty layer.
I did not get so lucky with the viewfinder itself. This is a lens made by gluing two convex pieces of plastic together. The choice to use plastic and two identical layers was a clear cost saving move. When new, you’d have no idea it wasn’t glass and when clear it makes the viewfinder brilliantly clear and bright. My copy, sadly, has seen much better days.
The plastic has suffered some kind of failure resulting in a hazing inside the two pieces. I tried for a while to get this apart to clean it, but even an alcohol soaking refused to encourage any adhesive to stop adhering any more. Any more forceful efforts began to show chances of the plastic just failing completely and I decided that this was a step too far and left it as is. It kind of works, you can see what the frame will contain, but the detail is lacking, it’s hazy and doesn’t give that bright view that the Ful-Vue was named after.
Learning, always learning
I made a really poor choice of paints for the mirror box assembly. I decided to go with high temperature resistant matt black, based on the premise that a high temperature paint designed for barbecues must be seriously robust. I also read a few forum posts suggesting this was a preferred option for camera restoration.
Whether I didn’t prepare the surface properly (it had a good sanding) or just got unlucky with the paint, I don’t really know. What I do know is it didn’t work well at all and just rubs off on your hands every time you touch it. I was really disappointed because it looked fantastic when it was painted up and I was going to do the entire body with it, but after realising it was no good I left the body with just a simple wash.
Things were about to go from bad to worse. I expected the reassembly process to be simplicity itself. How wrong I was.
The manual states this is a high precision cast metal body. I didn’t realise until, and this is not an exaggeration, over two hours of fiddling and frustration had passed that the two halves simply don’t fit together properly. The point blank refusal of the sides to squeeze nicely together had just baffled me for hours on end. I’d fiddled with light seal material, trimmed bits, removed bits, tried different thicknesses of material, sworn a thousand times at the little metal clip that pings off the viewfinder every single time I tried to install it. Nothing would make it go back together properly.
Looking at the photograph below, taken prior to disassembling, you can see a very visible gap running down the front between the two cast halves. In disbelief, I pulled it apart again, put the empty shells together and they just rocked from side to side due to them being uneven. At this point I could, and should, have put everything down and come back the next day with a file and some more patience. But I didn’t, because I have no patience, it was nearly midnight and I just wanted it back together.
Once more, I picked up the pieces and started slotting them together. Eventually, finally, after so much pain I managed to finally clip the viewfinder lens in without the retaining ring pinging out somewhere or sticking itself out and refusing to go behind the plastic. A nightmare.
Shutter timing
The shutter mechanism is as simple and manual as you can possibly imagine, yet the design as far as I’m concerned is genius. I still can’t believe that this can trigger and synchronise a flash from just three pieces of metal.
As I very quickly found out, the shutter works on very fine tolerances. The slightest pressure in the wrong place and it will resolutely refuse to fire, as I painfully learned during reassembly having to remove light seal material until it no longer put pressure on certain areas of the assembly. I had to give it an alcohol bath more than once when the pivot lubrication got into the actual shutter blade (if it can be called that) and acted like glue.
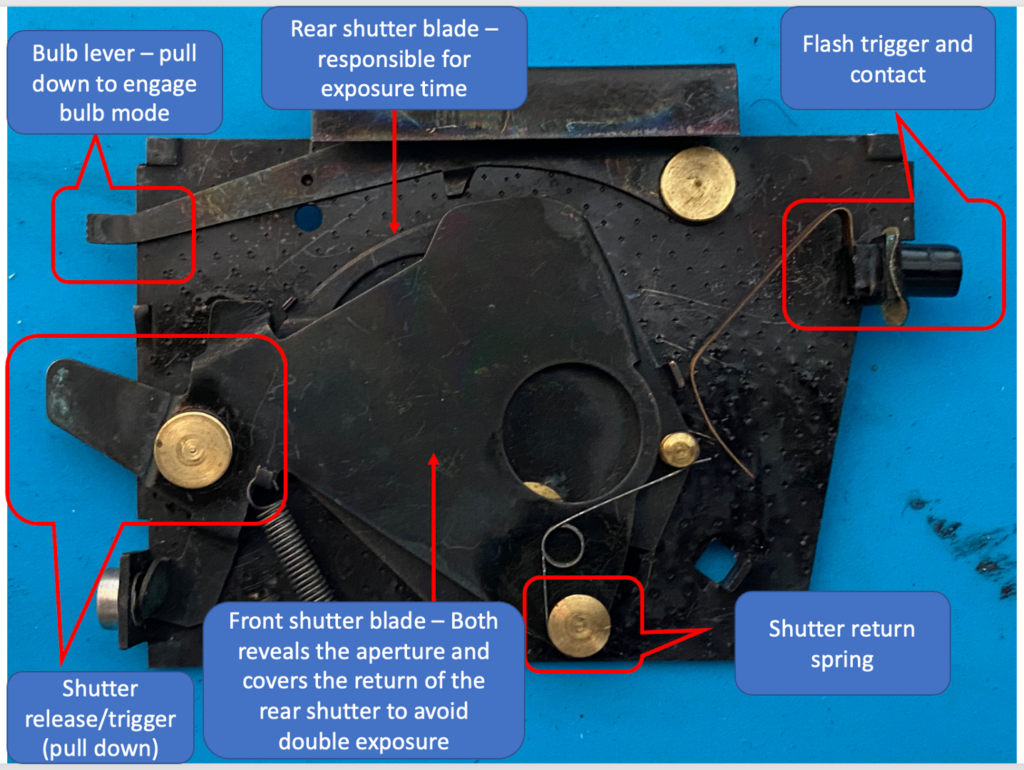
You can see from the diagram above and video below how simple, yet elegant this design is. The cleaning and restoring of this mechanism gave me a chance to work out what the shutter speed of the Ful-Vue is. I dug out the manual online and apparently the shutter speed is “instantaneous.” Nowhere is there a mention of either aperture or actual shutter speed, which is something of a problem when you’re trying to work out an exposure. Original owners of this must’ve just guessed whether conditions were right, clicked the shutter and hoped for something to come out.
The video above is 240fps. Counting the frames the shutter is open for gives a rough idea of the speed. I counted from the moment there is any kind of gap showing light and stopped when the rear blade had completely closed the shutter aperture. This gave a result of between 11 and 12 frames, it was surprisingly consistent. 240/12 = 1/20th of a second. Online estimates vary between 1/25th to a very wishful 1/50th. I guess for the age, a speed of approximately 1/20th isn’t bad for this shutter mechanism. I could probably alter that speed with different springs. Now there’s an idea…
I am not a professional
So there we have it, the fruits of an entire Saturday spent polishing, sanding, painting, swearing and wishing I’d just gone to bed instead of being a stubborn fool who doesn’t know where to stop.
Am I completely happy with the result? No, the paint job annoys me every time I look at it. But… in every other regard this camera is now in much better shape than it was a few days ago. It is ready to be actually used, resurrected as an image making tool rather than gathering dust in a junk shop waiting to be used as a prop or ornament.
I’ve managed to work out, clean and restore a shutter – a high point considering most engineering confuses me. The lenses are in excellent condition and I’ve managed to bend the back cover back into something like the right shape so it holds tightly to the body and no longer leaks light. If it wasn’t for the opaque plastic view finder, I’d actually be really happy with how it turned out for a first attempt.
Would I do this again? Absolutely, I’ve learned so much and I know a lot more about what I’m looking for, what would be possible and what would have to be given a miss unless I want to break the bank buying spares.
Now, I need to wind some 120 film on to 620 reels and give this a go. I’ve enjoyed this restoration, learning its history and background so much that I feel like I’ve become more attached to it as a result. It is not a complicated nor particularly high quality camera, but it is mine, I’ve put all the love and skill I have into restoring it and now I want it to live again, and live it shall. Very soon.
Oh and it may have a brother or sister on the way in the post after I discovered it’s predecessor was a seriously good looking piece of engineering…


Really enjoyed reading about your ensign fulvue journey. Have just purchased a copy via e bay and am about to embark on a similar mission. Fingers xrossed !! Regards, Paul.
There’s just something about them, they’re so absurdly simple yet they’re a real joy to use. I might go back to mine and run another roll through it soon. Enjoy and let us know how you get on!